The arrival of autumn brings with it a palette of warm, rich colours and cosy patterns, and what better way to celebrate the season than with autumn 2024 plaid nails? Plaid designs are not only timeless but also versatile, allowing you to express your creativity in many ways. Let’s take a look at some of the most stunning plaid nail designs that will be trending this fall.
Classic red and black paintings
When it comes to plaid nails for fall 2024, you can’t go wrong with the classic red and black combination. This design features a bold red base with black plaid detailing, creating a striking contrast that’s perfect for the fall season.
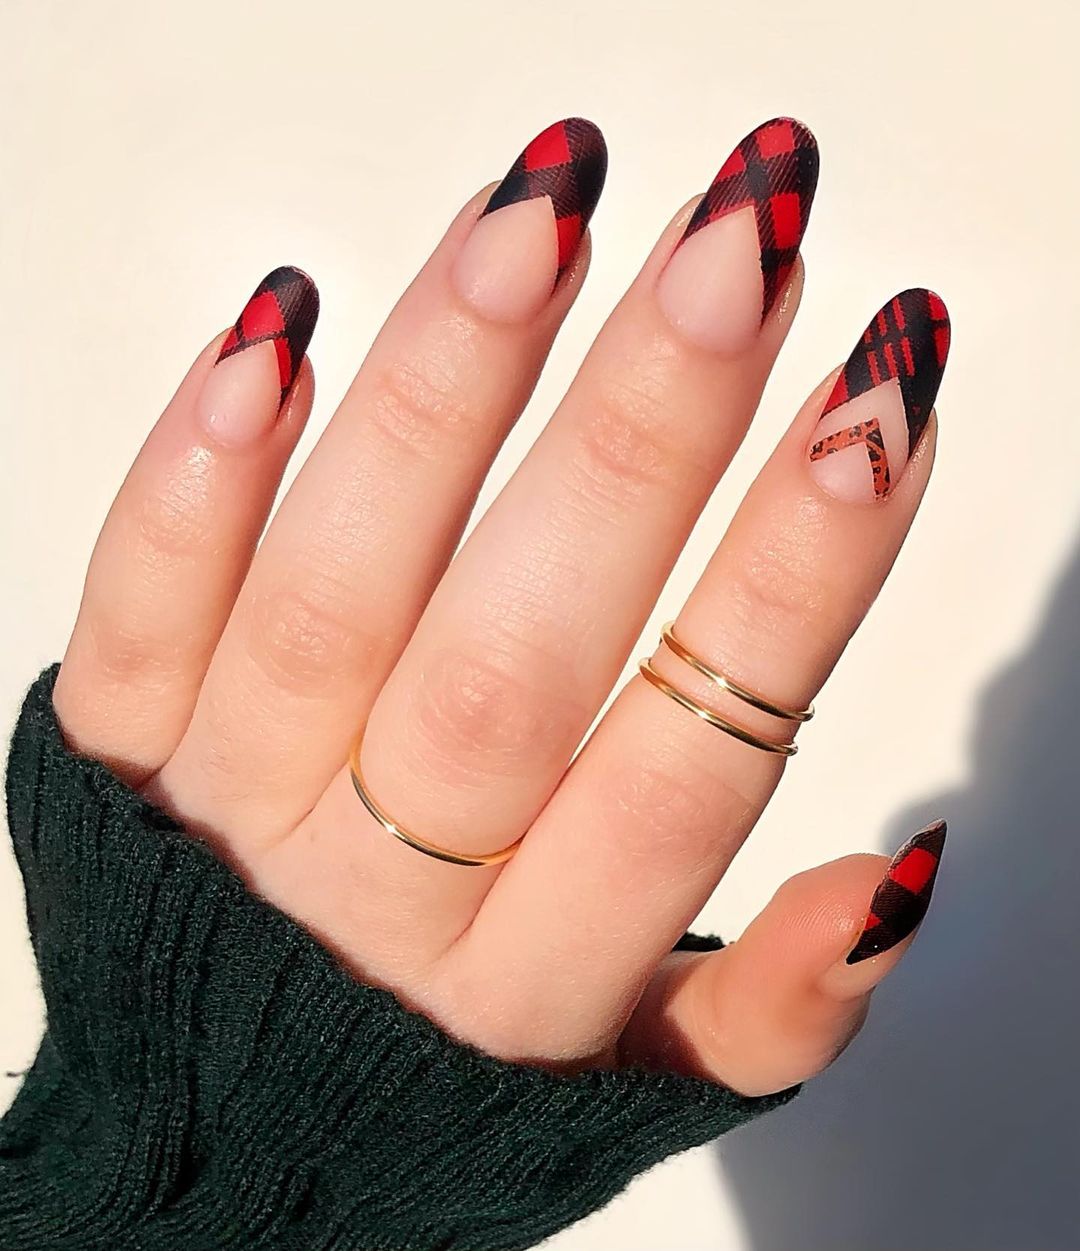
Photo credit: @lacquerjacks
Consumables:
- Base coat: OPI nail polish in ‘Big Apple Red’
- Checkered design: fine brush or pen for black nail art
- Top layer: Essie Gel-Setter
- Additional tools: Striping tape for precise lines
DIY Instructions:
- Apply a base coat to protect your nails.
- Paint your nails with two coats of red polish and let it dry completely.
- Use the striping tape to create the checkered pattern, then fill in the lines with the black nail art pen.
- Carefully remove the tape and allow the design to dry.
- Finish with a top coat to seal your design and add a glossy finish.
The perfection of pastel paintings
If you’re looking for a softer take on the plaid trend, this pastel-hued plaid design is cute and chic. Featuring a combination of light blues, pinks, and greens, this design is perfect for those who prefer a more subdued style.
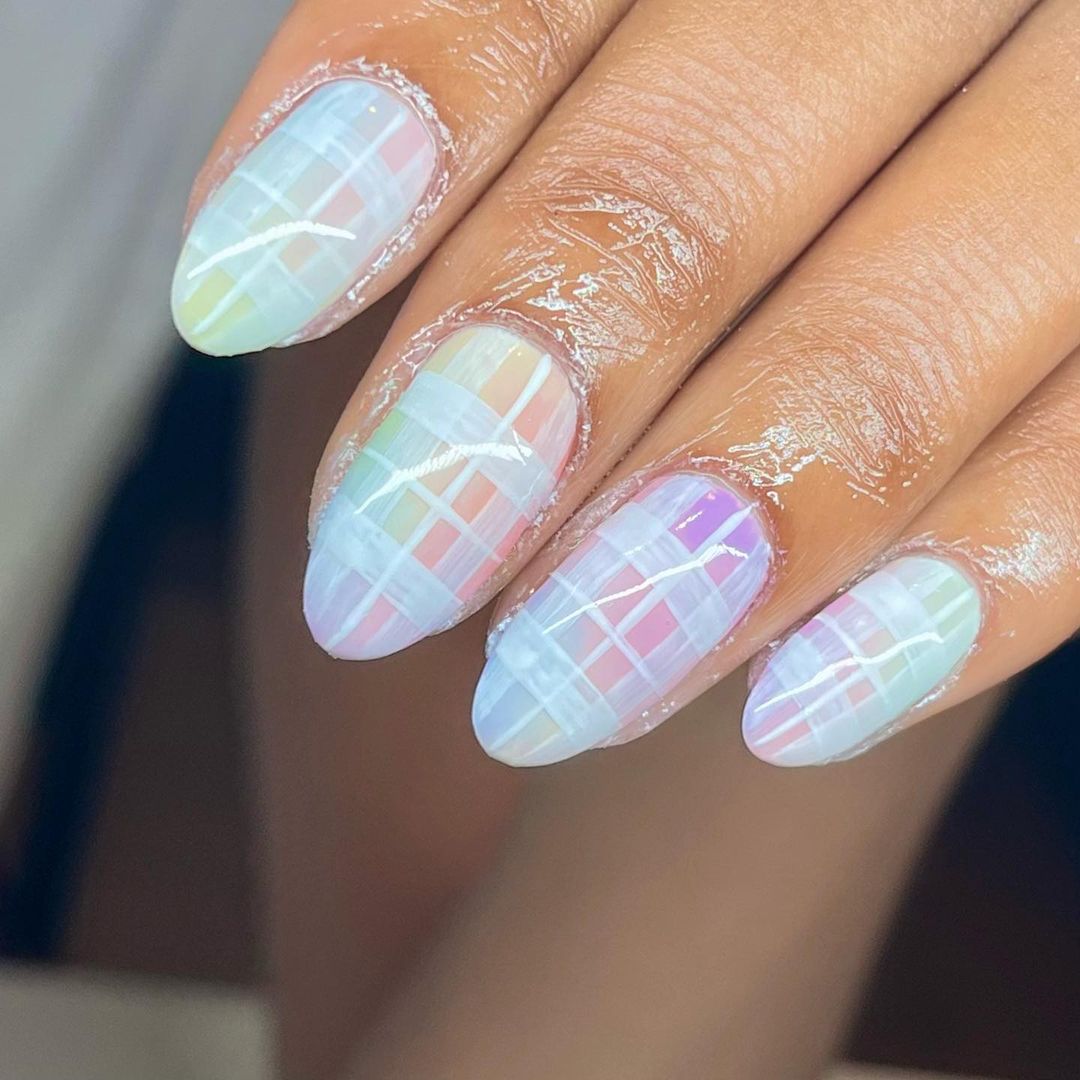 Photo credit: @nailsthatlooklikepaintings
Consumables:
- Base Coat: Sally Hansen Hard as Nails
- Checkered design: nail polishes in pastel shades (e.g. Essie ‘Mint Candy Apple’, OPI ‘Do You Lilac It?’, China Glaze ‘Peachy Keen’)
- Top Coat: Seche Vite Quick Dry Top Coat
- Additional tools: Fine nail art brush or striping brush
DIY Instructions:
- Start with a base coat to protect your nails.
- Apply a white base color to highlight pastels.
- Using the thin nail art brush, draw horizontal and vertical lines with the pastel colors to create the checkered pattern.
- Allow the design to dry completely before applying a top coat.
Navy blue and pink checks
This plaid design combines navy blue with pink accents and is both bold and stylish. The deep navy base color is contrasted with bright pink and white stripes, creating a fun and sophisticated look.
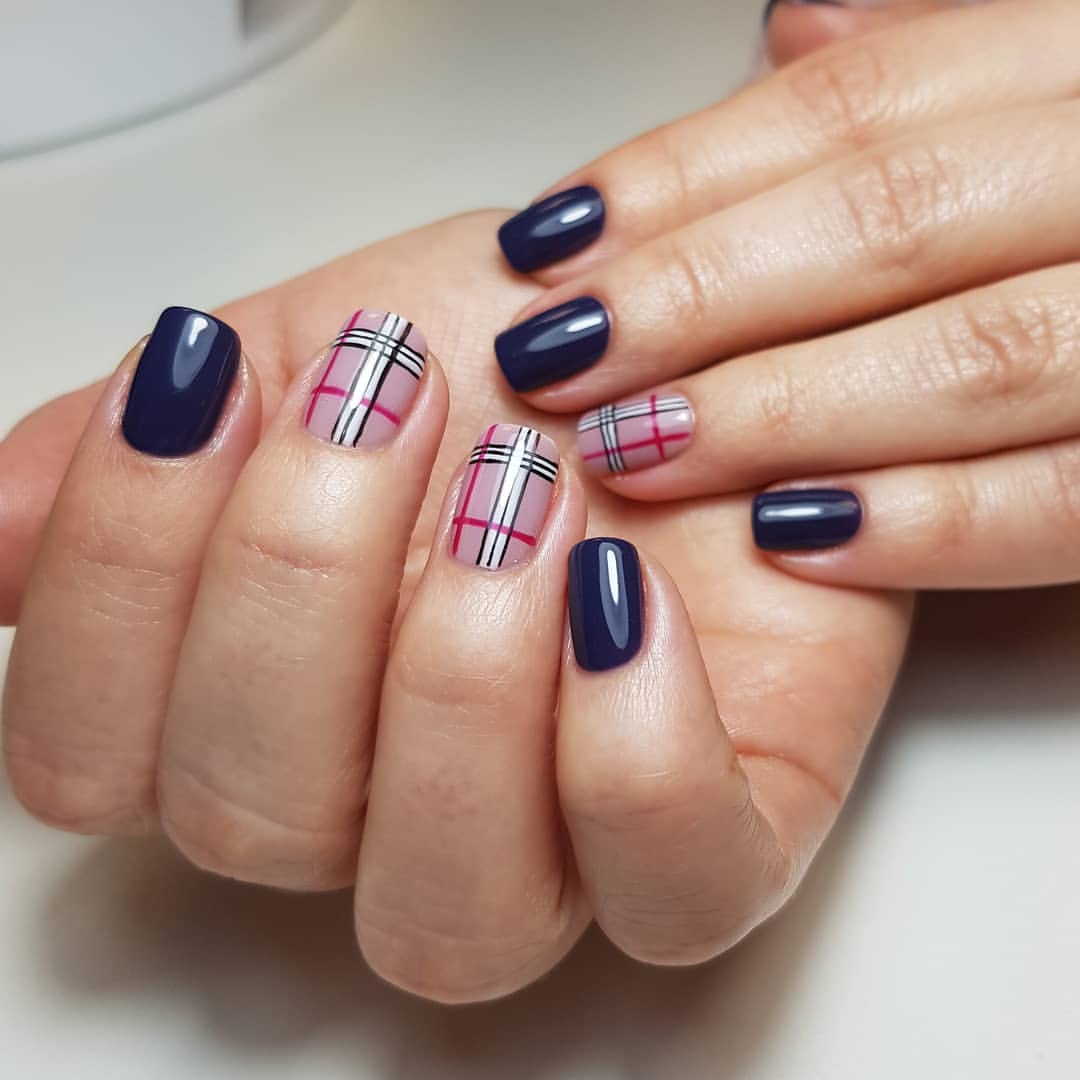
Photo credit: @roxanabenta
Consumables:
- Base Coat: Butter London Nail Base Coat
- Checkered design: Zoya ‘Sailor’ (navy), Essie ‘Cascade Cool’ (pink) and white nail art pen
- Top Coat: Deborah Lippmann Addicted To Speed Ultra Fast Drying Top Coat
- Additional tools: Striping tape or thin nail art brush
DIY Instructions:
- Apply a base coat to protect your nails.
- Paint your nails with the navy blue polish and let it dry completely.
- Use the striped tape to mark the checkered pattern and then fill it in with the pink and white nail polishes.
- Carefully remove the tape and allow the design to dry.
- Finish with a top coat to add shine and protect your design.
The perfection of pink paintings
This design features a striking combination of pink and black checks on a soft pink base, creating a modern and feminine look perfect for fall.
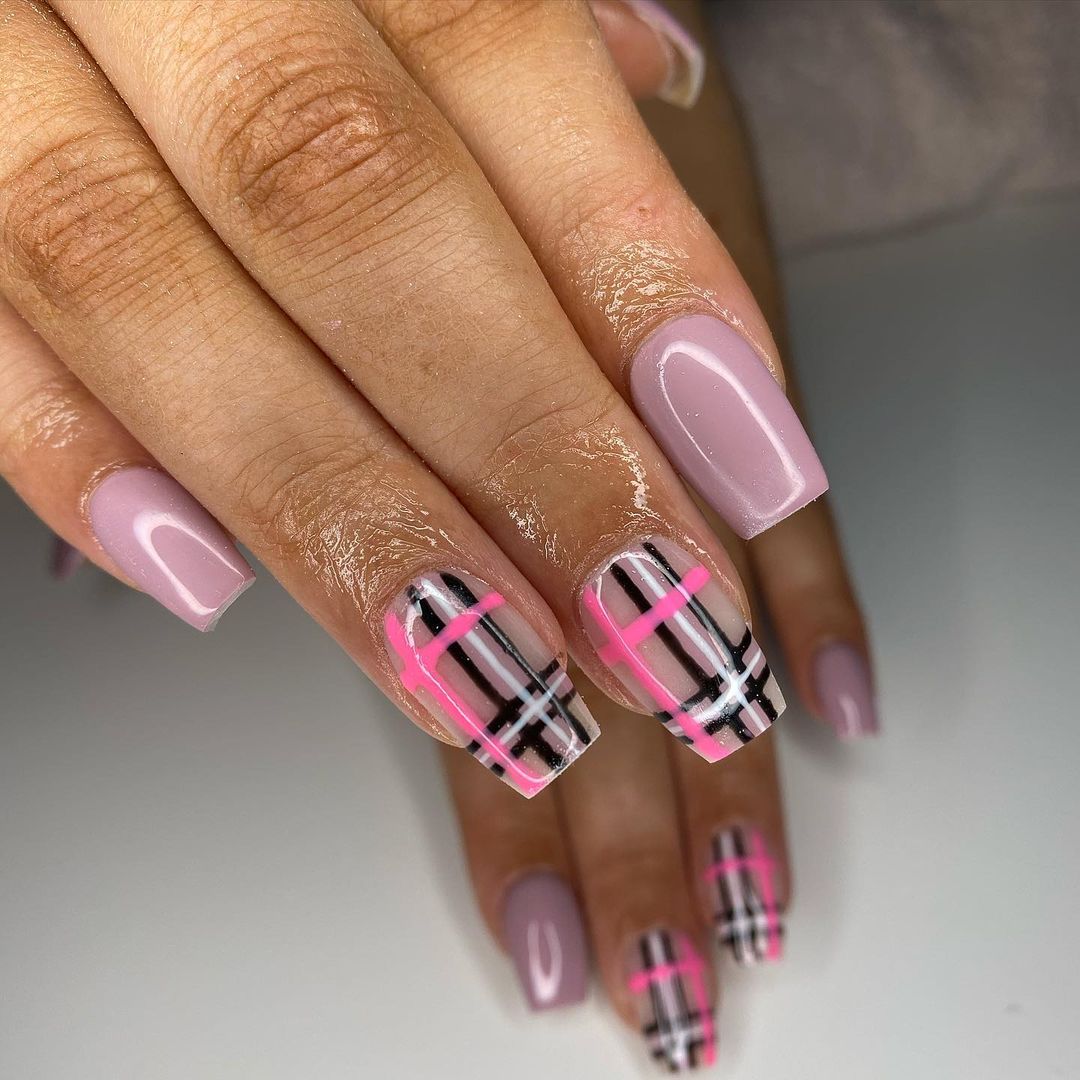 Photo credit: @by.tess_
Consumables:
- Base Layer: Essie First Base Base Layer
- Base Color: OPI ‘Mod About You’
- Checkered design: black, white and hot pink striped polishes or thin nail art brushes
- Top Coat: Seche Vite Top Coat
- Additional tools: Striping tape or nail art brush
DIY Instructions:
- Start with a base coat to protect your nails.
- Apply two coats of the light pink polish and let it dry completely.
- Use striping tape or a thin nail brush to create a checkered pattern with black, white, and hot pink lines.
- Carefully remove the tape and allow the design to dry.
- Finish with a top coat to seal and protect your manicure.

Mint green and white checkered
This fresh and modern design features a combination of mint green and white, with a subtle checkered accent adding a touch of sophistication.
 Photo credit: @hodz.nails
Consumables:
- Base layer: Orly Bonder base layer
- Base colors: Zoya ‘Neely’ (mint green) and OPI ‘Alpine Snow’ (white)
- Checkered design: yellow and white striped nail polishes or thin nail art brushes
- Top Coat: Essie Gel Couture Top Coat
- Additional tools: Striping tape or nail art brush
DIY Instructions:
- Apply a base coat to protect your nails.
- Paint your nails with the mint green and white nail polishes as shown in the design and let them dry.
- Create a checkered pattern on your accent nail using striped tape or a thin nail art brush with yellow and white lines.
- Carefully remove the tape and allow the design to dry.
- Apply a top coat to finish the look and ensure durability.
Burgundy and white checkered elegance
This elegant design features a deep burgundy base with black and white checkered details, perfect for a sophisticated and chic autumn look.
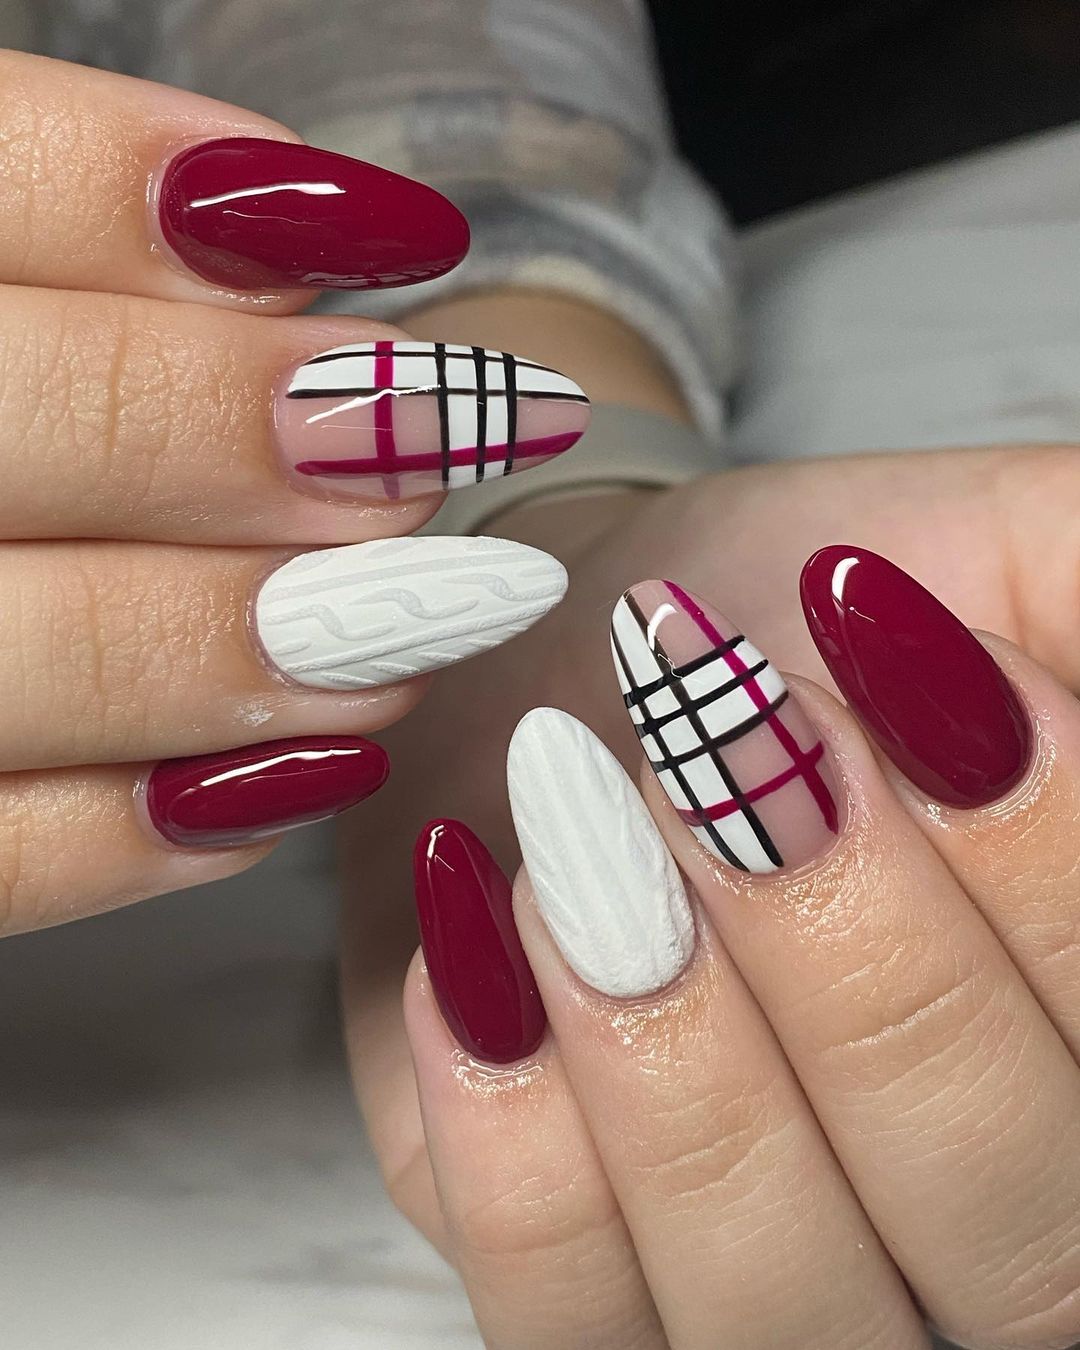
Photo credit: @nailtech_ali
Consumables:
- Base Coat: Nail Tek Foundation II
- Base colors: Essie ‘Bordeaux’ (burgundy) and OPI ‘Alpine Snow’ (white)
- Checkered design: black stripe polish or thin brush for nail art
- Top Layer: Sally Hansen Insta-Dri Top Layer
- Additional tools: Striping tape or nail art brush
DIY Instructions:
- Start with a base coat to protect your nails.
- Apply two coats of burgundy polish on all nails except the accent nails, which should be painted white.
- Create a checkered pattern on your accent nails using black and burgundy striped polish.
- Carefully remove the striping tape and allow the design to dry.
- Finish with a top coat to add shine and durability to your manicure.
Elegant black and white
This design combines the timeless elegance of black enamel with a sleek white checkered detail, creating a sophisticated and modern look.
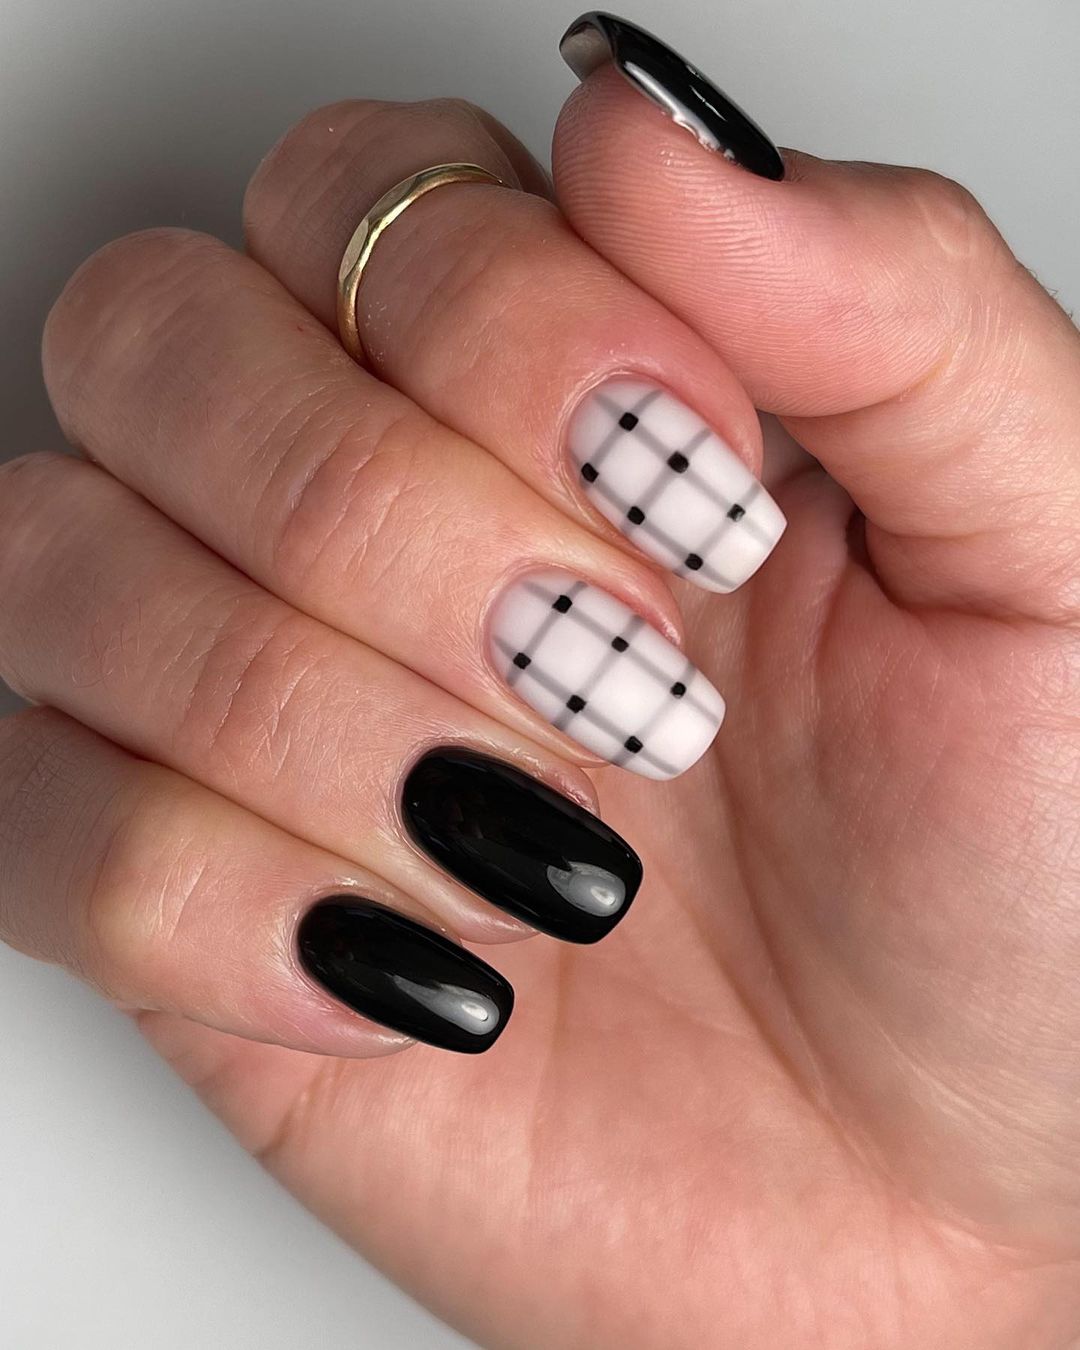 Photo credit: @studiobarinails
Consumables:
- Base layer: Orly Bonder base layer
- Base colors: Essie ‘Licorice’ (black) and OPI ‘Alpine Snow’ (white)
- Checkered design: black stripe polish or thin brush for nail art
- Top Coat: Seche Vite Top Coat
- Additional tools: Striping tape or nail art brush
DIY Instructions:
- Apply a base coat to protect your nails.
- Paint your nails with black polish, except for accent nails, which should be painted white.
- Use striping tape or a thin nail art brush to create black grid lines on your nails with a white accent.
- Carefully remove the tape and allow the design to dry.
- Finish with a top coat to seal and protect your manicure.
Elegance in mauve and copper checks
This sophisticated design features a combination of mauve, copper and pink hues with intricate checks and textured accents, creating a sleek, modern look.
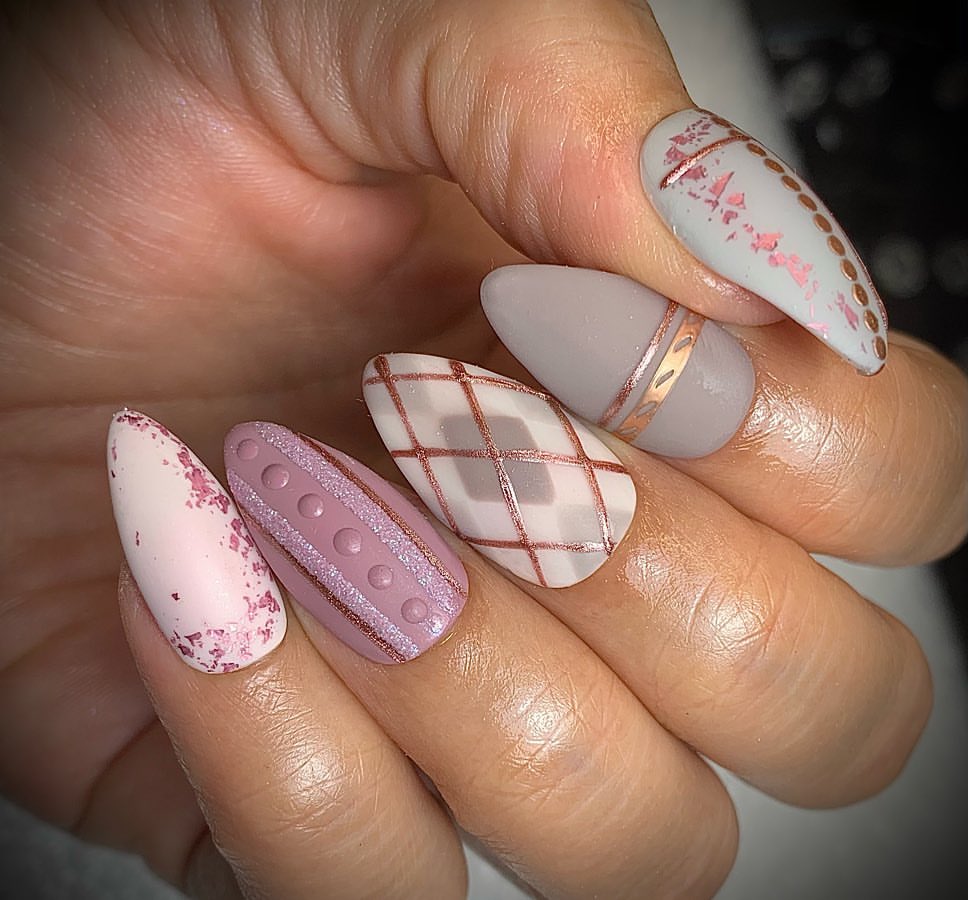
Photo credit: @asprettyas_nailsbykelly
Consumables:
- Base Coat: Butter London Nail Base Coat
- Base colors: Zoya ‘Rue’ (mauve) and Essie ‘Penny Talk’ (copper)
- Checkered design: copper stripe polish or thin brush for nail art
- Top Layer: Sally Hansen Insta-Dri Top Layer
- Additional tools: striping tape, dotting tool and nail art brush
DIY Instructions:
- Apply a base coat to protect your nails.
- Paint your nails with the mauve polish and let them dry completely.
- Use striping tape or a thin nail art brush to create the checkered pattern with the copper polish.
- Add textured dots and lines using the dotting and striping tape tool.
- Carefully remove the tape and allow the design to dry.
- Apply a top coat to finish the look and ensure durability.
Bright blue squares
This vibrant design features a deep blue base with black and white checkered accents, creating a striking, modern look that’s perfect for fall.
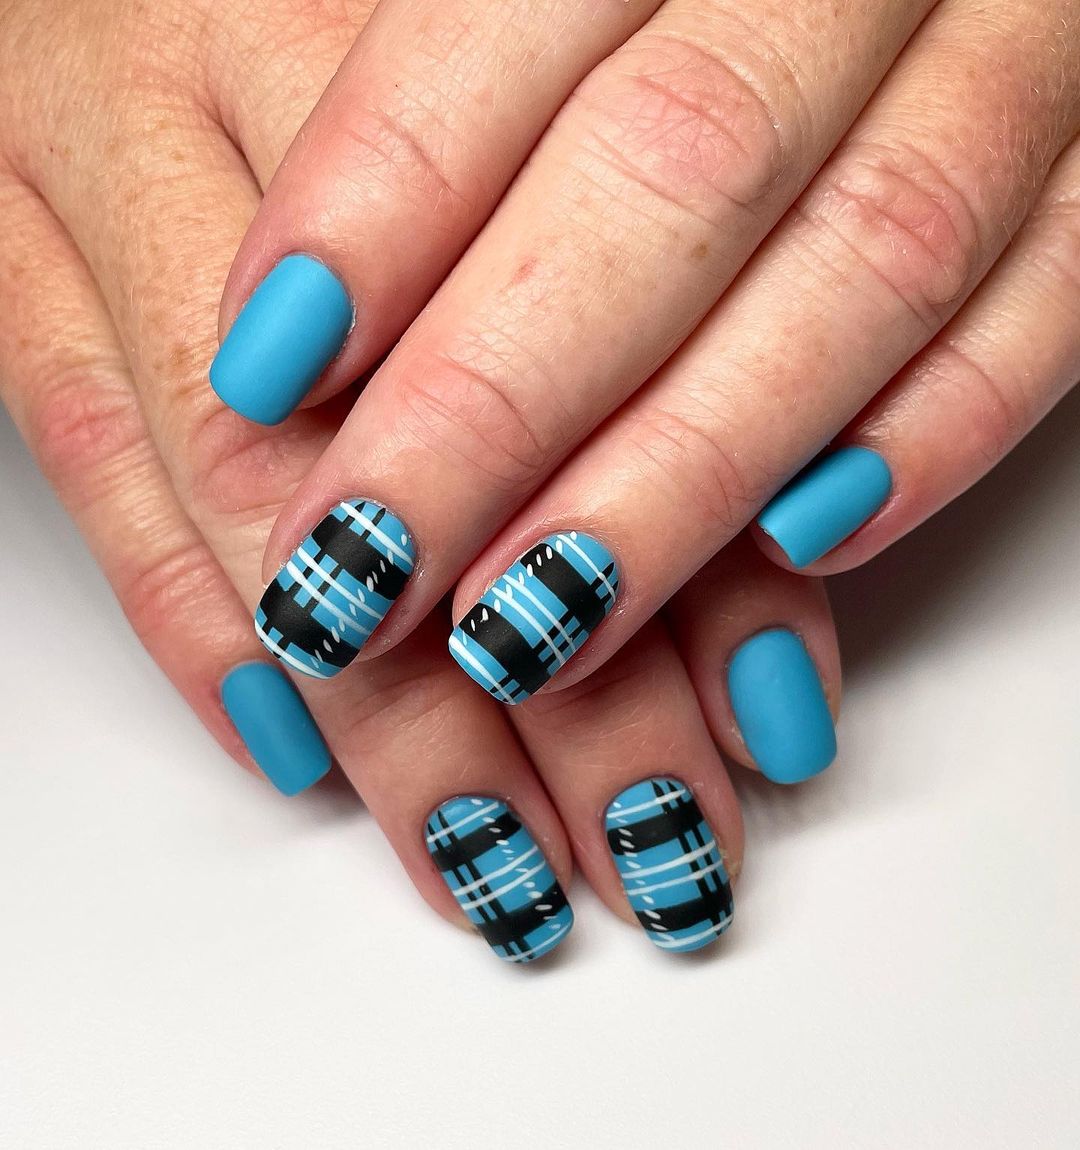 Photo credit: @sonyas.nails
Consumables:
- Base coat: CND adhesive base coat
- Base color: ‘Too Yacht to Handle’ porcelain enamel (blue)
- Checkered design: black and white striped nail polishes or thin nail art brushes
- Top Coat: Essie Matte About You Top Coat
- Additional tools: Striping tape or nail art brush
DIY Instructions:
- Start with a base coat to protect your nails.
- Apply two coats of blue polish and allow to dry completely.
- Use striping tape or a thin nail brush to create a checkered pattern with black and white lines.
- Carefully remove the tape and allow the design to dry.
- Finish with a matte top coat to add texture and depth to the manicure.

Red and black buffalo checks
This bold design combines classic red and black tartan with a touch of black sparkle, creating a chic and edgy look for fall.
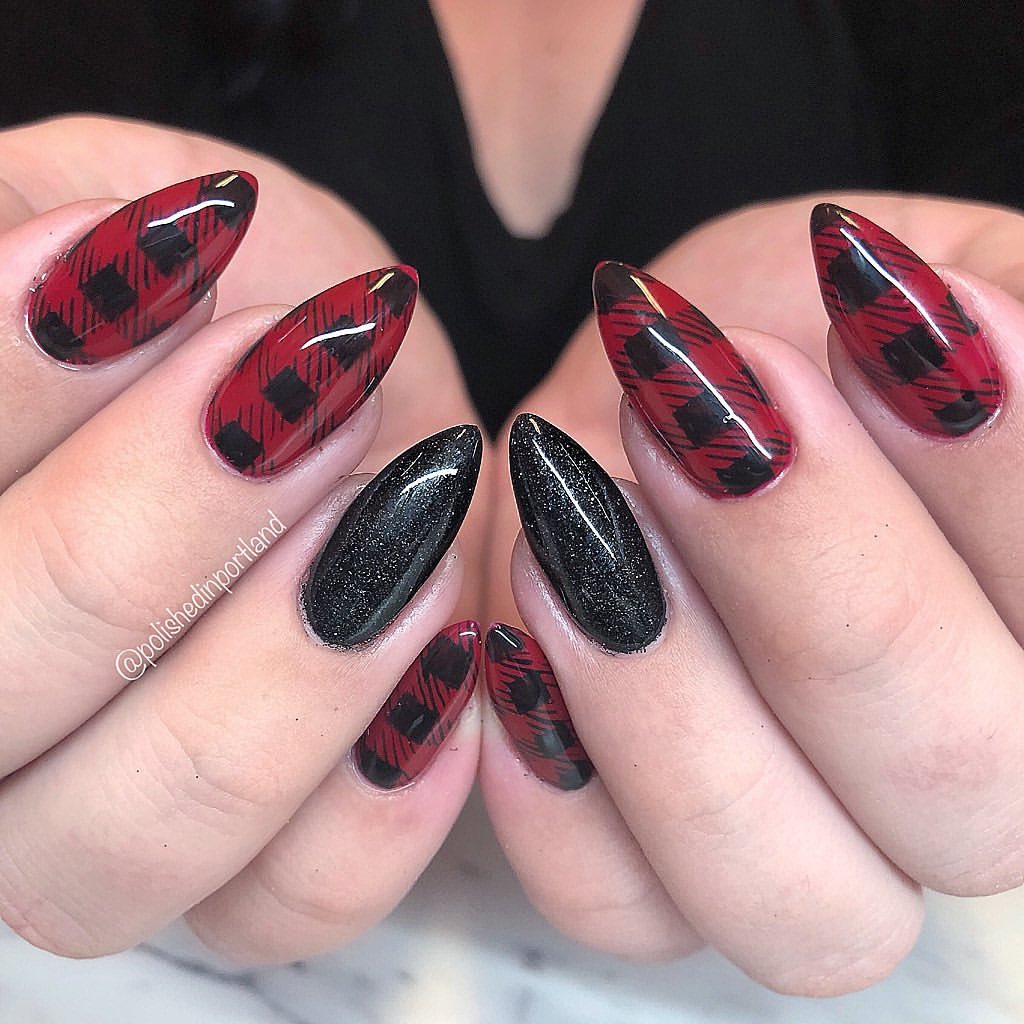 Photo credit: @polishedinportland
Consumables:
- Base coat: OPI Nail Envy
- Base colors: Essie ‘Forever Yummy’ (red) and China Glaze ‘Liquid Leather’ (black)
- Checkered design: black stripe polish or thin nail art brush and black glitter polish.
- Top Coat: Deborah Lippmann Addicted To Speed Ultra Fast Drying Top Coat
- Additional tools: striping tape and nail art brush
DIY Instructions:
- Apply a base coat to protect your nails.
- Paint your nails with red polish, leaving some black nails as an accent.
- Use striping tape or a thin nail art brush to create the black checkered pattern on red nails.
- Apply black glitter polish on nails with black details for extra shine.
- Carefully remove the tape and allow the design to dry.
- Finish with a top coat to seal and protect your manicure.
Classic red and black paintings
This design combines a deep red base with a classic black check pattern, creating a timeless and sophisticated look, perfect for fall.
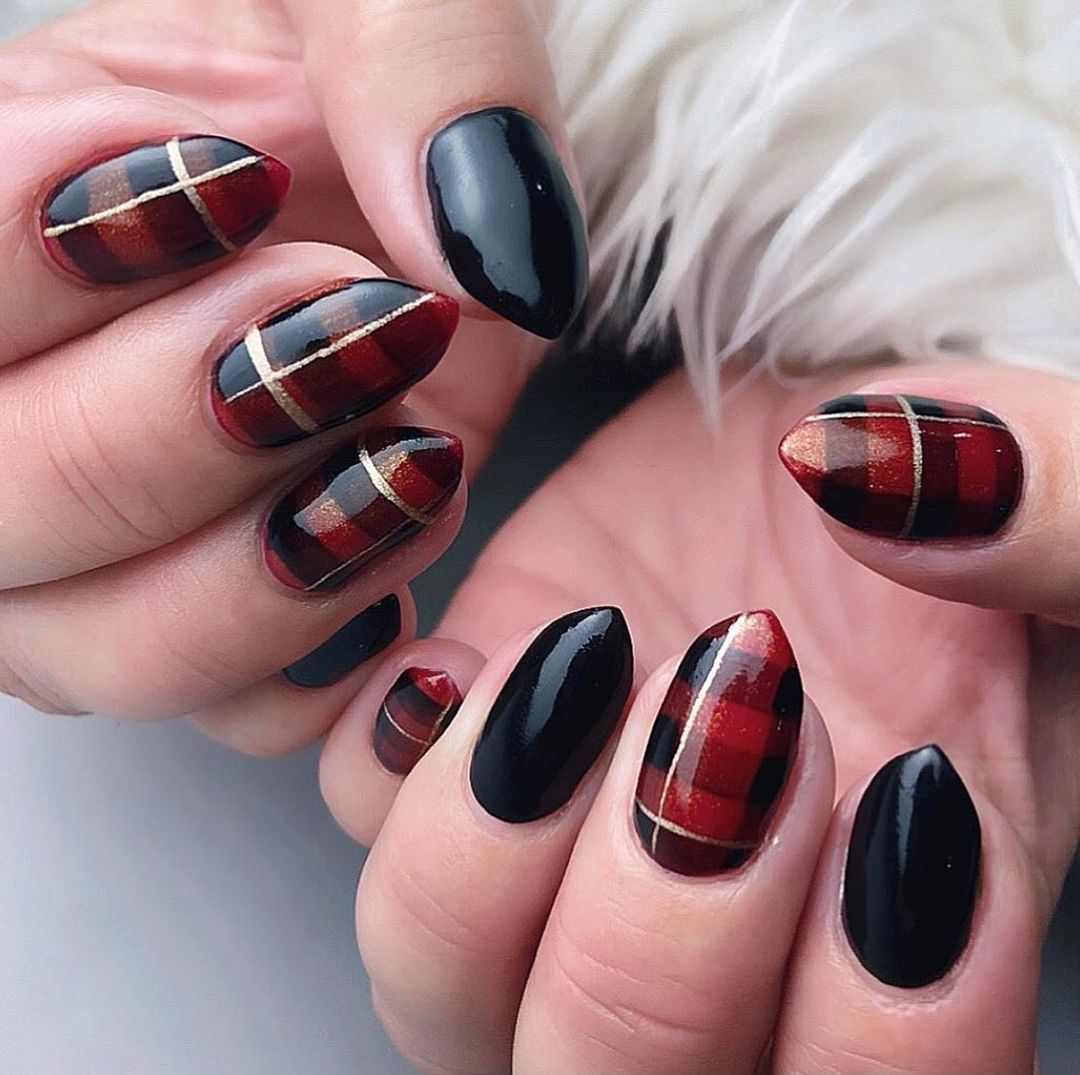
Photo credit: @bioseaweedgel
Consumables:
- Base Layer: Essie First Base Base Layer
- Base Color: OPI ‘Big Apple Red’
- Checkered design: black stripe polish or thin brush for nail art
- Top Coat: Seche Vite Top Coat
- Additional tools: Striping tape or nail art brush
DIY Instructions:
- Start with a base coat to protect your nails.
- Apply two coats of red polish and allow to dry completely.
- Use striping tape or a thin nail art brush to create the black checkered pattern.
- Carefully remove the tape and allow the design to dry.
- Finish with a top coat to add shine and durability to your manicure.
Nude elegance and checks
This design combines a sophisticated nude base with an elegant checkered detail, creating a chic and versatile look, perfect for any occasion.
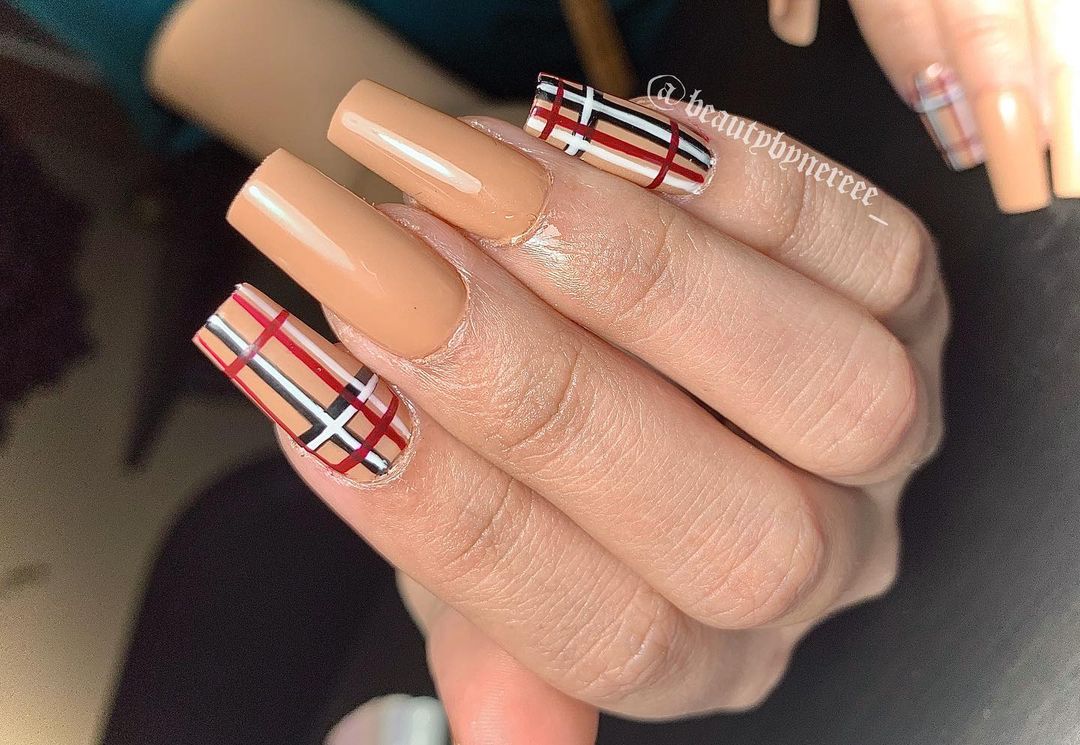 Photo credit: @beautybynereee_
Consumables:
- Base Coat: Nail Tek Foundation II
- Base Color: Essie ‘Topless & Barefoot’ (Nude)
- Checkered design: red, white and black striped nail polishes or thin nail art brushes
- Top Layer: Sally Hansen Insta-Dri Top Layer
- Additional tools: Striping tape or nail art brush
DIY Instructions:
- Apply a base coat to protect your nails.
- Paint your nails with the nude polish and let them dry completely.
- Use striping tape or a thin nail art brush to create a checkered pattern with red, white, and black lines on your accent nails.
- Carefully remove the tape and allow the design to dry.
- Apply a top coat to finish the look and ensure durability.
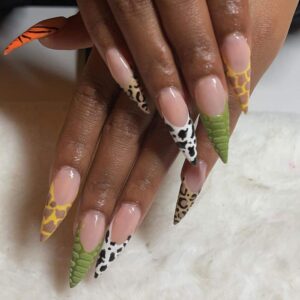
Rainbow checkered nails
This design features a fun and colorful checkered pattern on a natural nude base, creating a vibrant and fun look perfect for any season.
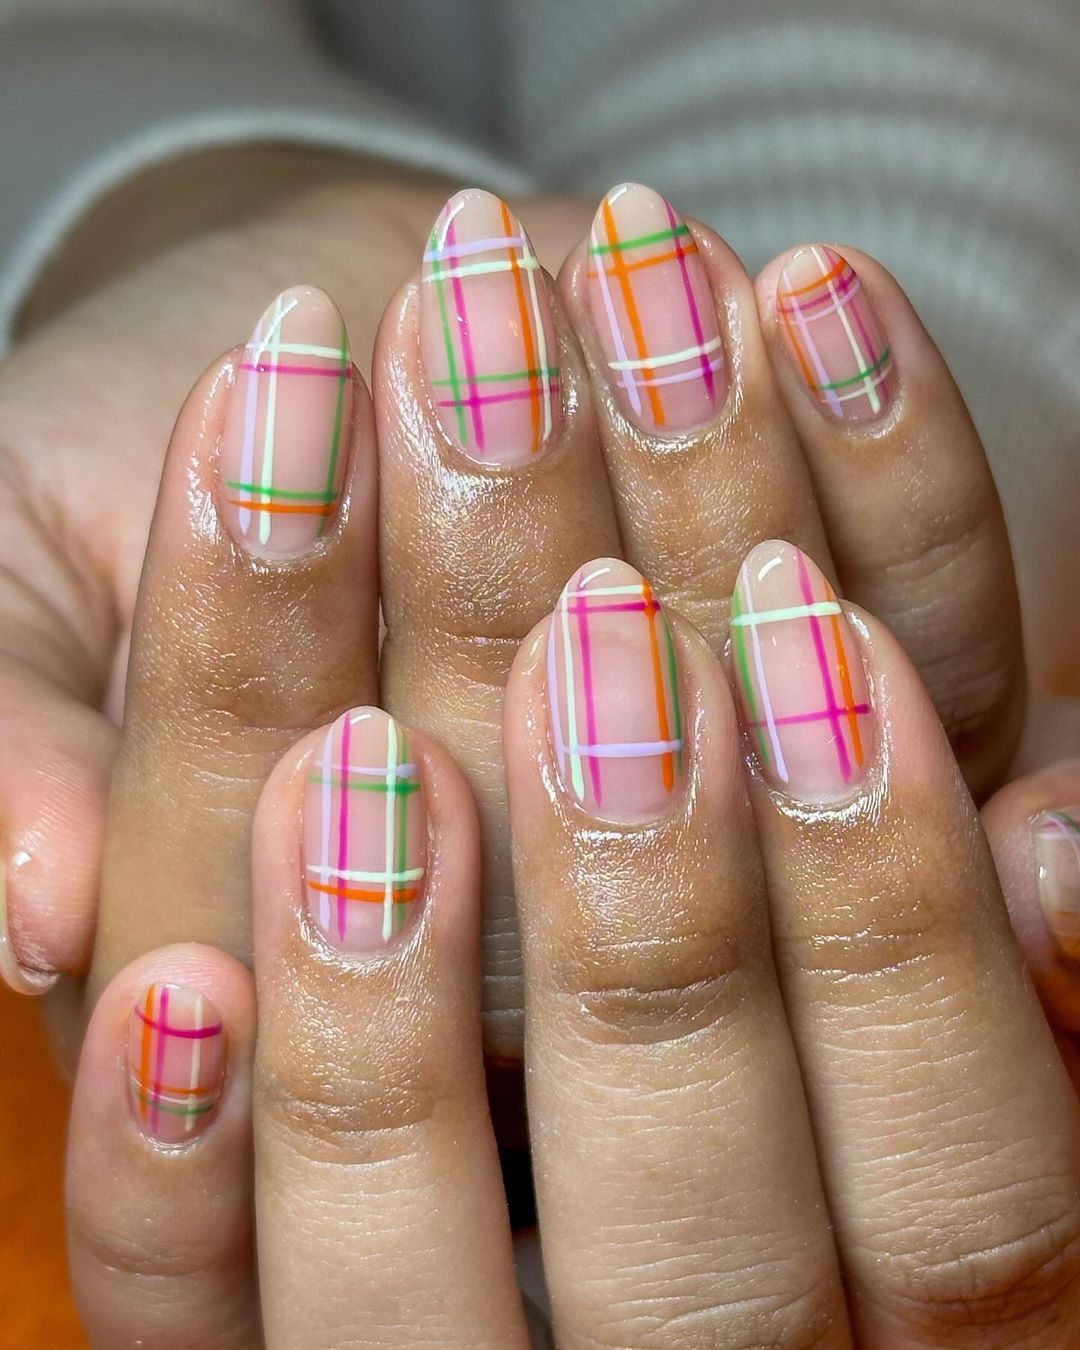
Photo credit: @_studiosaku_
Consumables:
- Base Layer: Essie First Base Base Layer
- Base color: OPI ‘Bubble Bath’
- Checkered design: striped nail polishes in pink, green, orange and yellow, or thin nail art brushes.
- Top Coat: Seche Vite Top Coat
- Additional tools: Striping tape or nail art brush
DIY Instructions:
- Apply a base coat to protect your nails.
- Paint your nails with the nude polish and let them dry completely.
- Use striping tape or a thin nail brush to create a checkered pattern with pink, green, orange, and yellow lines.
- Carefully remove the tape and allow the design to dry.
- Finish with a top coat to seal and protect your manicure.
Mix of flowers and paintings
This whimsical design combines plaid and floral patterns with a mix of colors and textures, creating a unique and charming look.
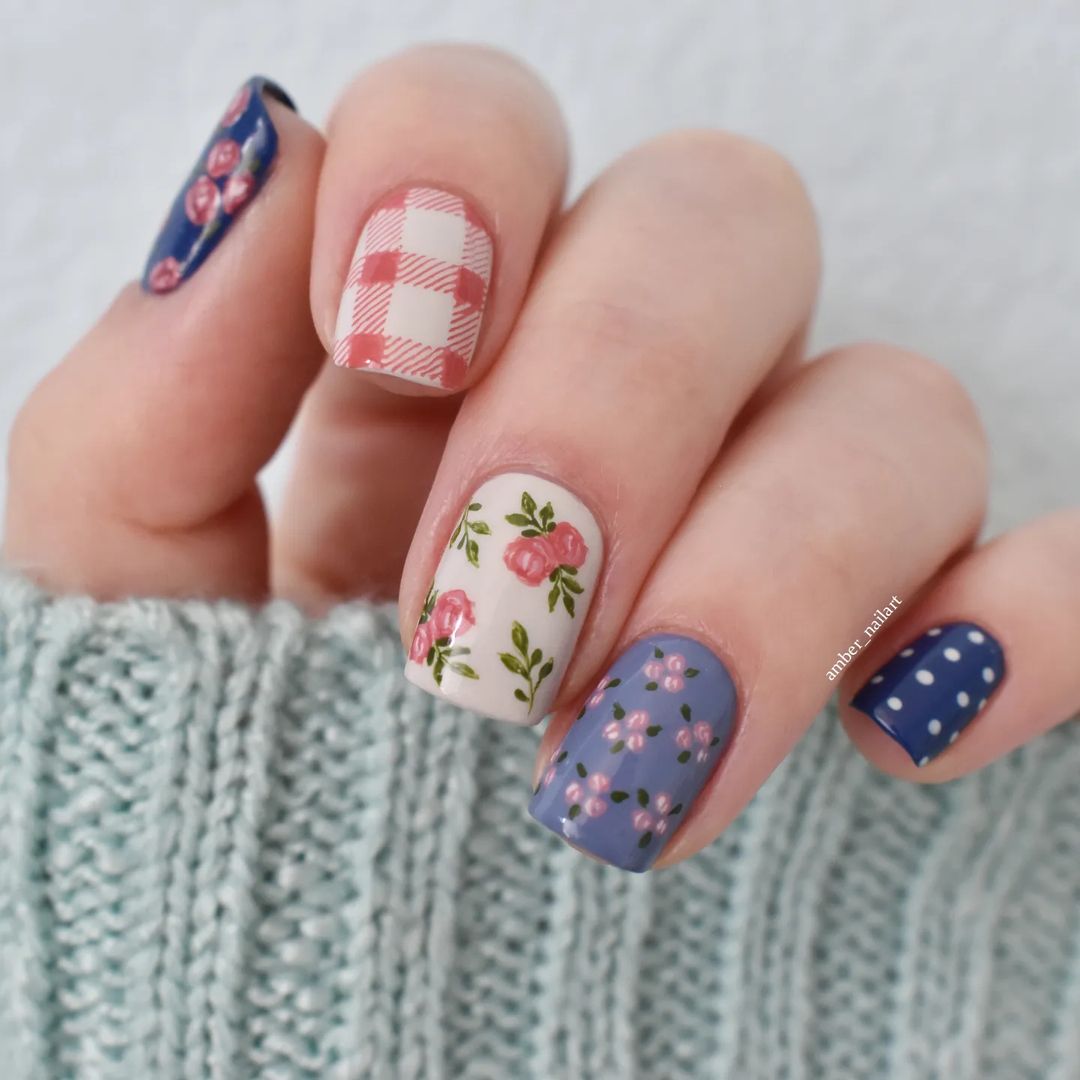 Photo credit: @amber_nailart
Consumables:
- Base Coat: Nail Tek Foundation II
- Base colors: Essie ‘Ballet Slippers’ (pink), OPI ‘Alpine Snow’ (white) and China Glaze ‘Too Yacht to Handle’ (blue)
- Checkered design: pink and white striped nail polishes or thin nail art brushes
- Floral design: green and pink nail art pens
- Polka Dots: Tool for making white dots
- Top Layer: Sally Hansen Insta-Dri Top Layer
- Additional tools: striping tape and nail art brush
DIY Instructions:
- Apply a base coat to protect your nails.
- Paint your nails with the base colors and let them dry completely.
- Use striping tape or a thin nail art brush to create the checkered pattern on pink nails.
- Add floral designs on white and blue nails using nail art markers.
- Create polka dots on blue nails using a dotting tool.
- Carefully remove the tape and allow the design to dry.
- Apply a top coat to finish the look and ensure durability.
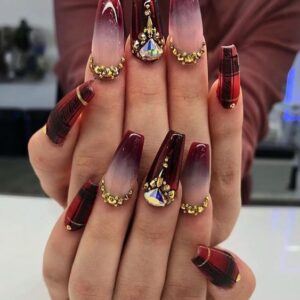
Glamorous Scottish plaid fabric
This bold and glamorous design features a combination of plaid patterns with metallic accents and rhinestones, creating a luxurious and eye-catching look.
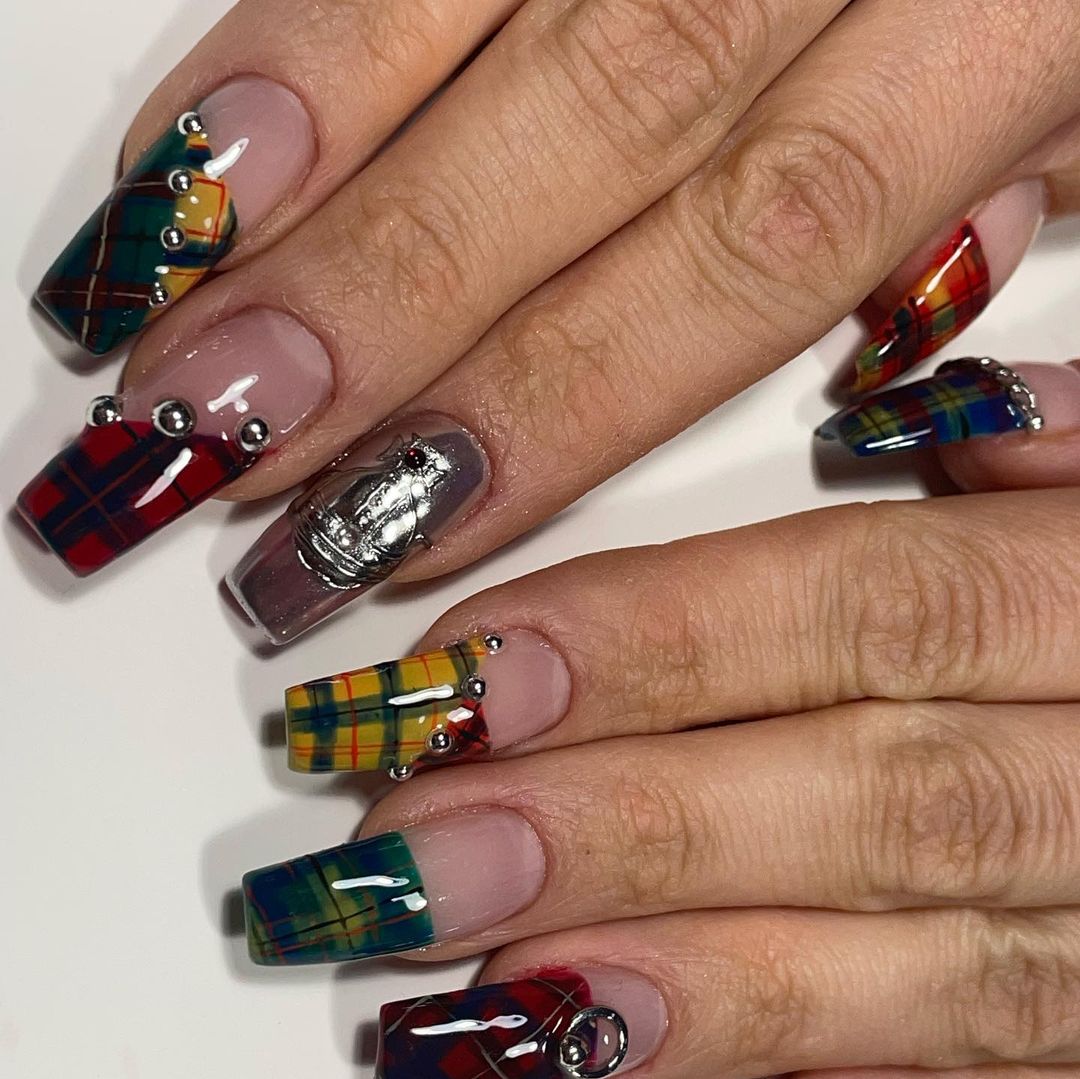
Photo credit: @nailmeanie
Consumables:
- Base layer: Orly Bonder base layer
- Base colors: Essie ‘Licorice’ (black), OPI ‘Big Apple Red’, China Glaze ‘Four Leaf Clover’ (green) and Butter London ‘The Full Monty’ (gold)
- Checkered design: black, red, green and gold striped polishes or thin nail art brushes
- Rhinestones: Various sizes and colors.
- Top Coat: Seche Vite Top Coat
- Additional tools: striping tape, nail art brush and rhinestone applicator.
DIY Instructions:
- Apply a base coat to protect your nails.
- Paint your nails with the base colors and let them dry completely.
- Use striping tape or a thin nail brush to create plaid patterns with the different colors.
- Add rhinestones to accentuate the design and add a touch of glamour.
- Carefully remove the tape and allow the design to dry.
- Apply a top coat to finish the look and ensure durability.
Green and yellow squares
This design features a vibrant green and yellow checkered pattern with white accents, creating a lively and energetic look.
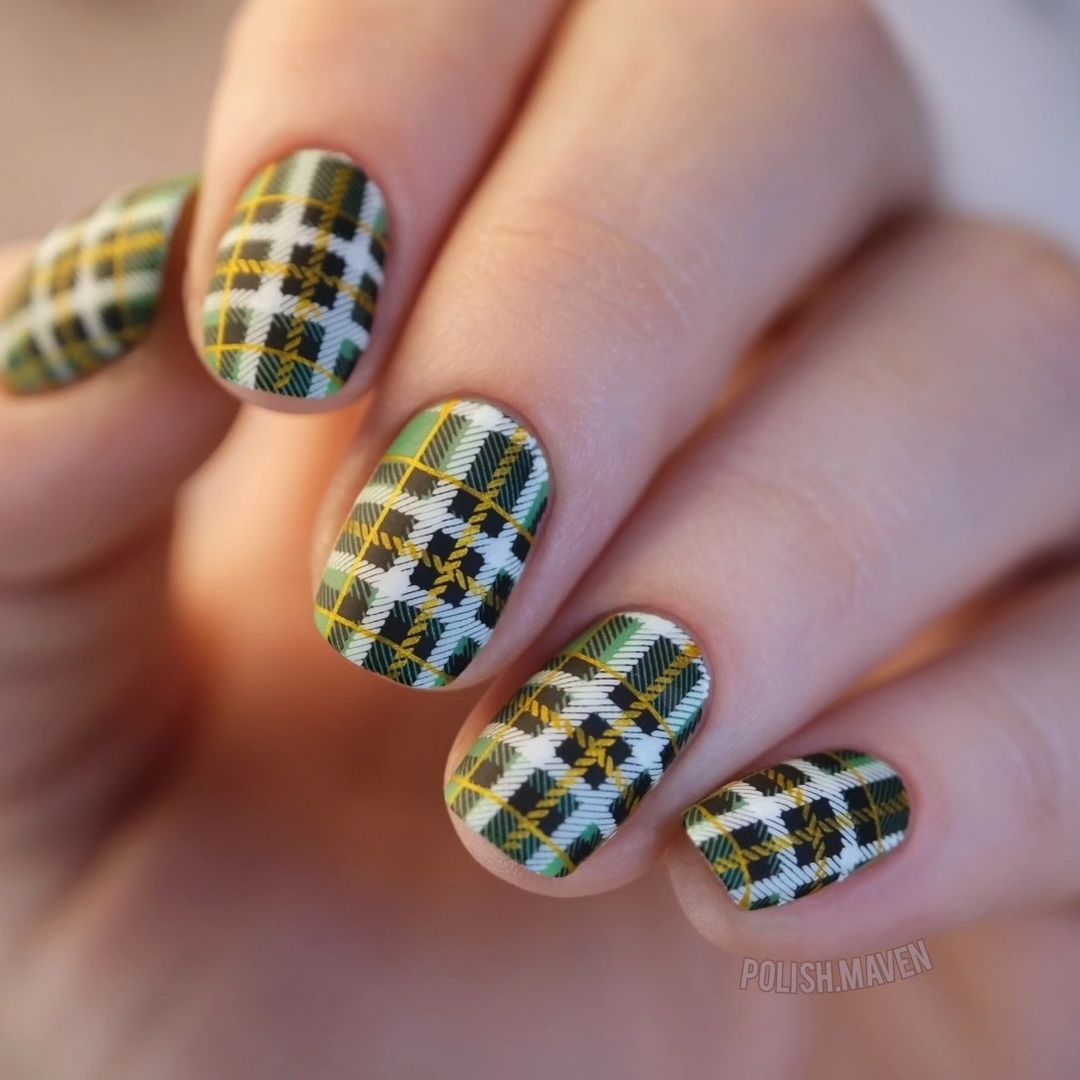 Photo credit: @polish.maven
Consumables:
- Base coat: CND adhesive base coat
- Base colors: OPI ‘Jade is the New Black’ (green) and China Glaze ‘Happy Go Lucky’ (yellow)
- Checkered design: white stripe polish or thin brush for nail art
- Top Coat: Essie Gel Couture Top Coat
- Additional tools: Striping tape or nail art brush
DIY Instructions:
- Start with a base coat to protect your nails.
- Apply two coats of green and yellow polish, alternating on each nail, and let them dry completely.
- Use striping tape or a thin nail brush to create a checkered pattern with white lines.
- Carefully remove the tape and allow the design to dry.
- Finish with a top coat to add shine and durability to your manicure.
Yellow and blue squares
This fun and bold design combines bright yellow and blue checkered patterns with a matte finish, creating a striking and modern look.
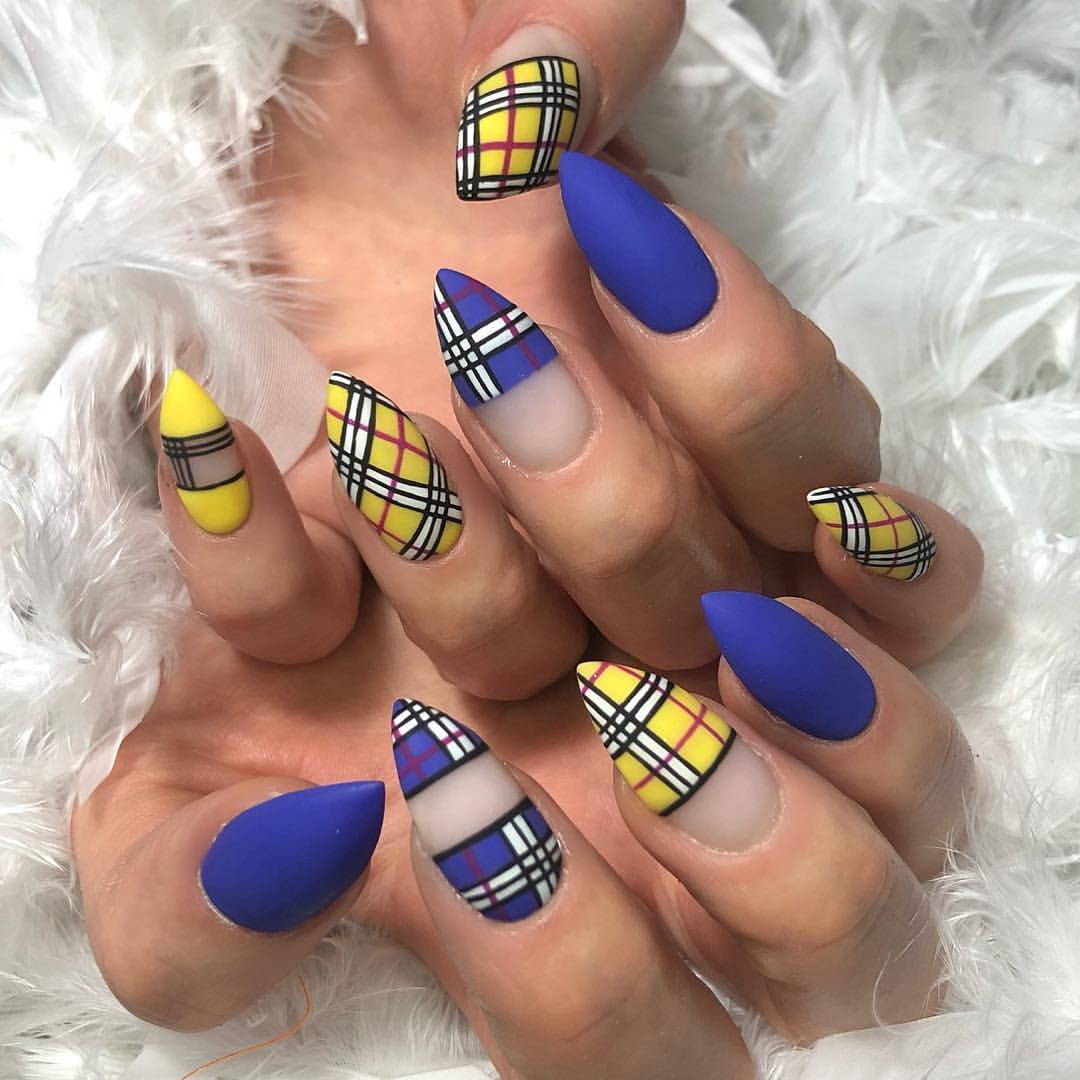
Photo credit: @electriknailz
Consumables:
- Base Coat: Nail Tek Foundation II
- Base colors: Essie ‘Butler Please’ (blue) and China Glaze ‘Happy Go Lucky’ (yellow)
- Checkered design: black and white striped nail polishes or thin nail art brushes
- Top Coat: Essie Matte About You Top Coat
- Additional tools: Striping tape or nail art brush
DIY Instructions:
- Apply a base coat to protect your nails.
- Paint your nails with the base colors and let them dry completely.
- Use striping tape or a thin nail brush to create a checkered pattern with black and white lines.
- Carefully remove the tape and allow the design to dry.
- Apply a matte top coat to finish the look and ensure durability.
Orange and gold checks
This warm and festive design features a vibrant orange base with gold plaid accents, creating a cozy and elegant look perfect for fall.
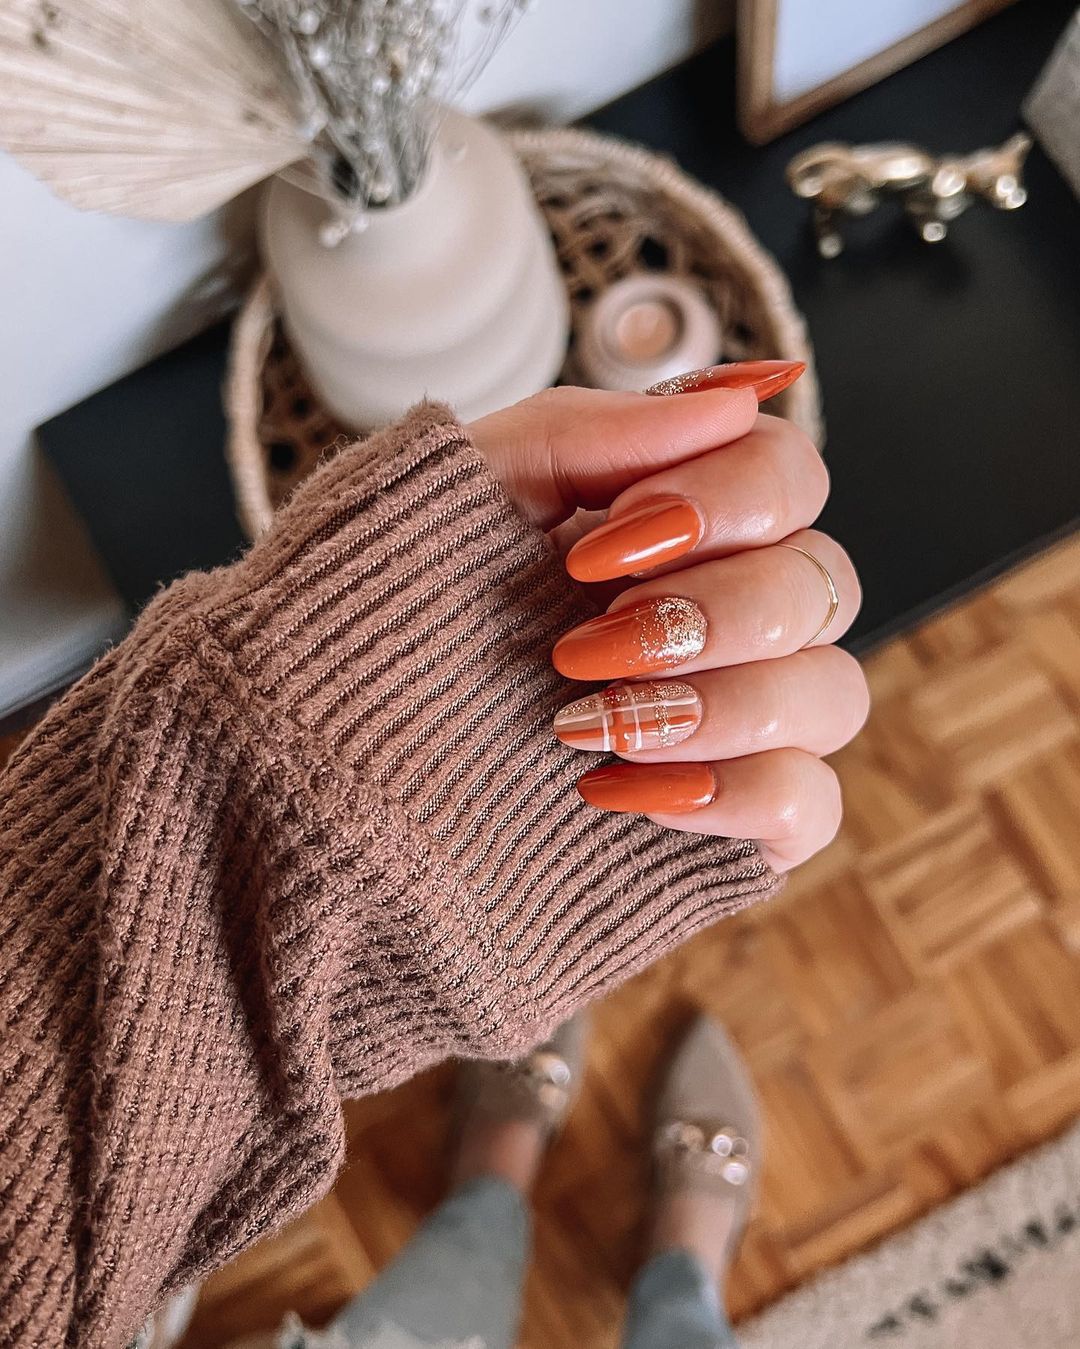 Photo credit: @style.by.nayla
Consumables:
- Base Coat: Butter London Nail Base Coat
- Base Color: OPI ‘A Good Man-darin is Hard to Find’ (Orange)
- Checkered design: gold stripe polish or thin brush for nail art
- Top Coat: Seche Vite Top Coat
- Additional tools: Striping tape or nail art brush
DIY Instructions:
- Apply a base coat to protect your nails.
- Paint your nails with the orange polish and let them dry completely.
- Use striping tape or a thin nail brush to create a checkered pattern with gold lines.
- Carefully remove the tape and allow the design to dry.
- Finish with a top coat to add shine and durability to your manicure.
Glamorous turquoise plaid
This design features a striking turquoise checkered pattern with silver accents on a nude base, creating a modern and stylish look.
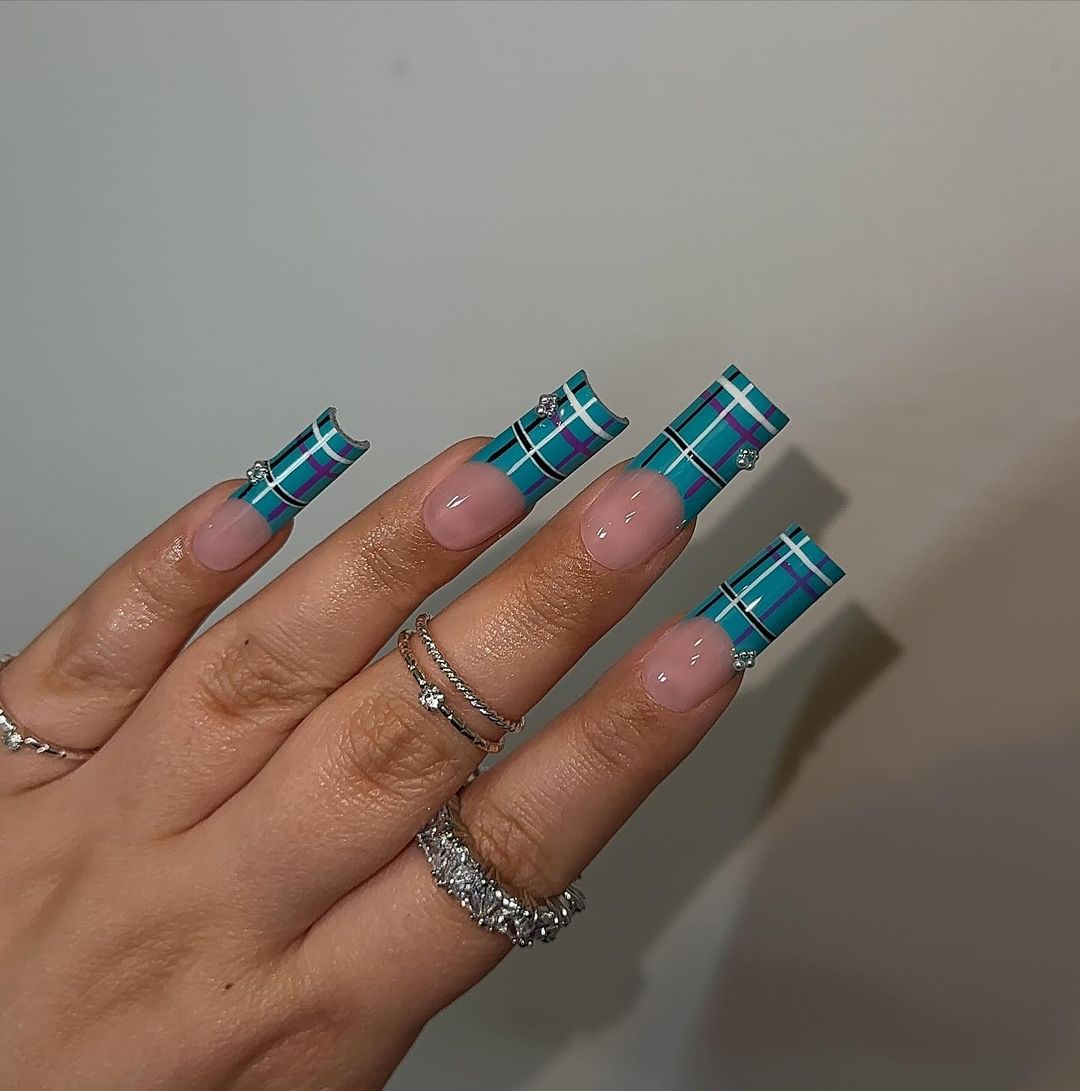 Photo credit: @nailed.byeryn
Consumables:
- Base layer: Orly Bonder base layer
- Base Color: OPI ‘Be There in a Prosecco’ (Nude)
- Checkered design: turquoise, purple and silver striped nail polishes or thin nail art brushes
- Rhinestones: Silver rhinestones in various sizes.
- Top Coat: Seche Vite Top Coat
- Additional tools: striping tape and rhinestone applicator
DIY Instructions:
- Apply a base coat to protect your nails.
- Paint your nails with the nude polish and let them dry completely.
- Use striping tape or a thin nail brush to create the turquoise and purple checkered pattern.
- Add silver accents and apply rhinestones to enhance the design.
- Carefully remove the tape and allow the design to dry.
- Finish with a top coat to seal and protect your manicure.
The perfection of pink paintings
This fun design features a bright pink base with colorful checkered patterns, creating a fun and vibrant look.
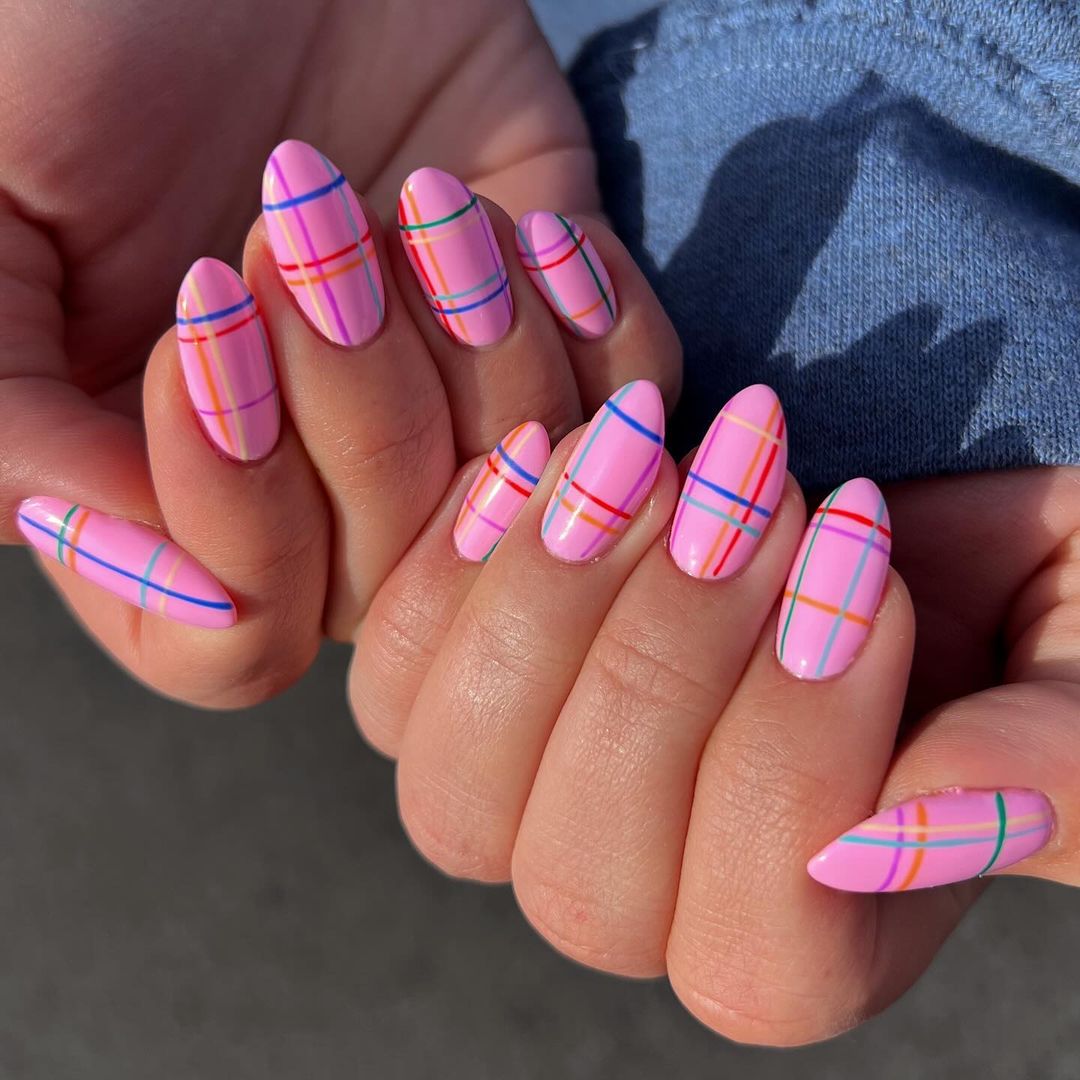 Photo credit: @mynailgirlness
Consumables:
- Base Layer: Essie First Base Base Layer
- Base Color: OPI ‘Pink Flamenco’
- Checkered design: blue, orange, green and white striped nail polishes or thin nail art brushes
- Top Layer: Sally Hansen Insta-Dri Top Layer
- Additional tools: Striping tape or nail art brush
DIY Instructions:
- Apply a base coat to protect your nails.
- Paint your nails with pink polish and let them dry completely.
- Use striping tape or a thin nail art brush to create the colorful checkered pattern.
- Carefully remove the tape and allow the design to dry.
- Finish with a top coat to seal and protect your manicure.
Autumn paintings and pumpkin delights
This festive design combines autumnal plaid with hand-painted pumpkins, creating a charming, seasonal look.
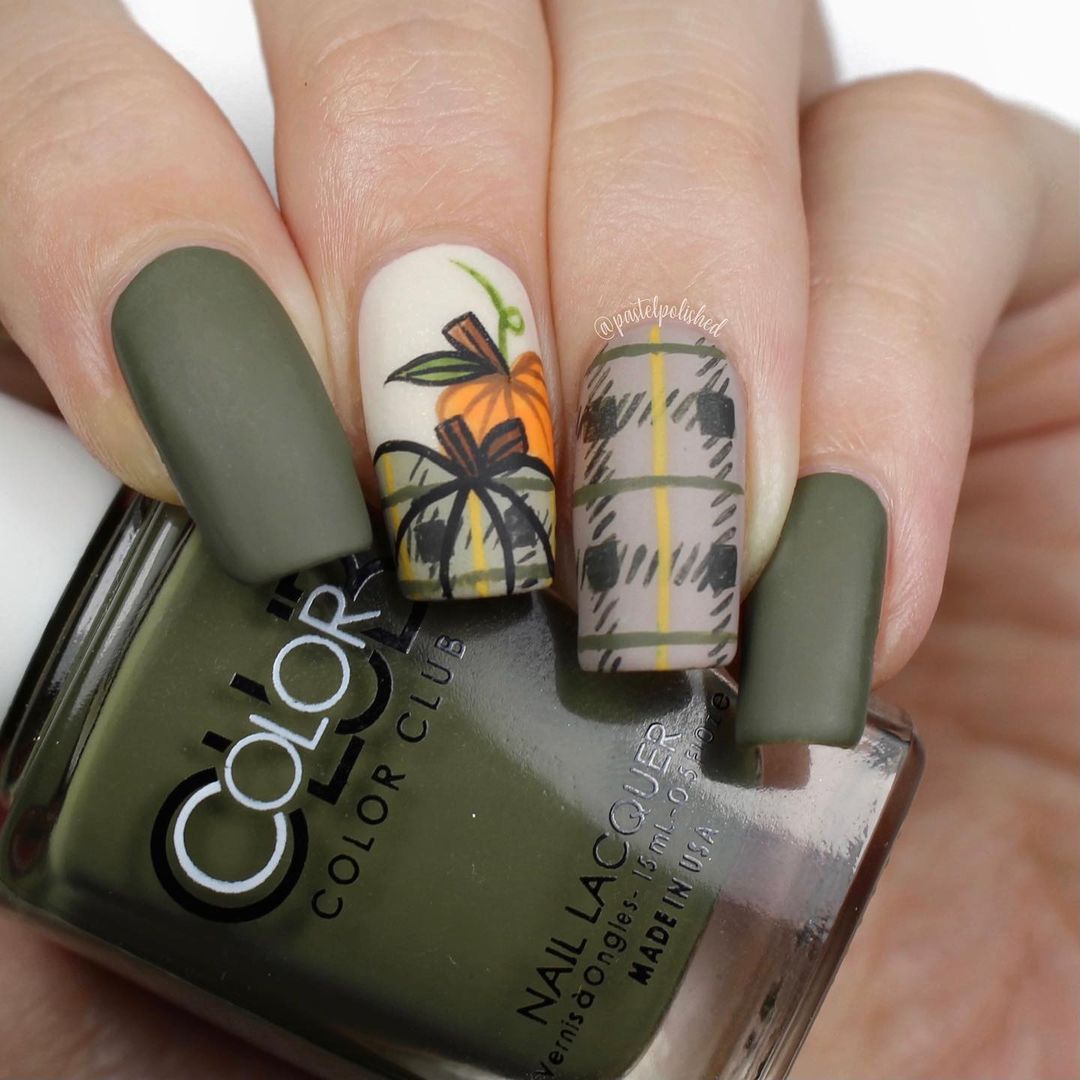 Photo credit: @pastelpolished
Consumables:
- Base coat: CND adhesive base coat
- Base colors: Color Club ‘Nature’s Way’ (olive green) and OPI ‘My Vampire is Buff’ (neutral)
- Checkered design: brown, orange and yellow striped polishes or thin nail art brushes
- Pumpkin Design: Orange, Green and Black Nail Art Markers
- Top Coat: Essie Matte About You Top Coat
- Additional tools: striping tape and nail art brush
DIY Instructions:
- Apply a base coat to protect your nails.
- Paint your nails with the olive green and neutral nail polishes and let them dry completely.
- Use striping tape or a thin nail art brush to create the checkered pattern on neutral nails.
- Hand paint pumpkins using nail art markers on your accent nail.
- Carefully remove the tape and allow the design to dry.
- Apply a matte top coat to finish the look and ensure long-lasting wear.
Burgundy and beige checks
This elegant design features a classic burgundy and beige check pattern with a matte finish, creating a sophisticated and timeless look.
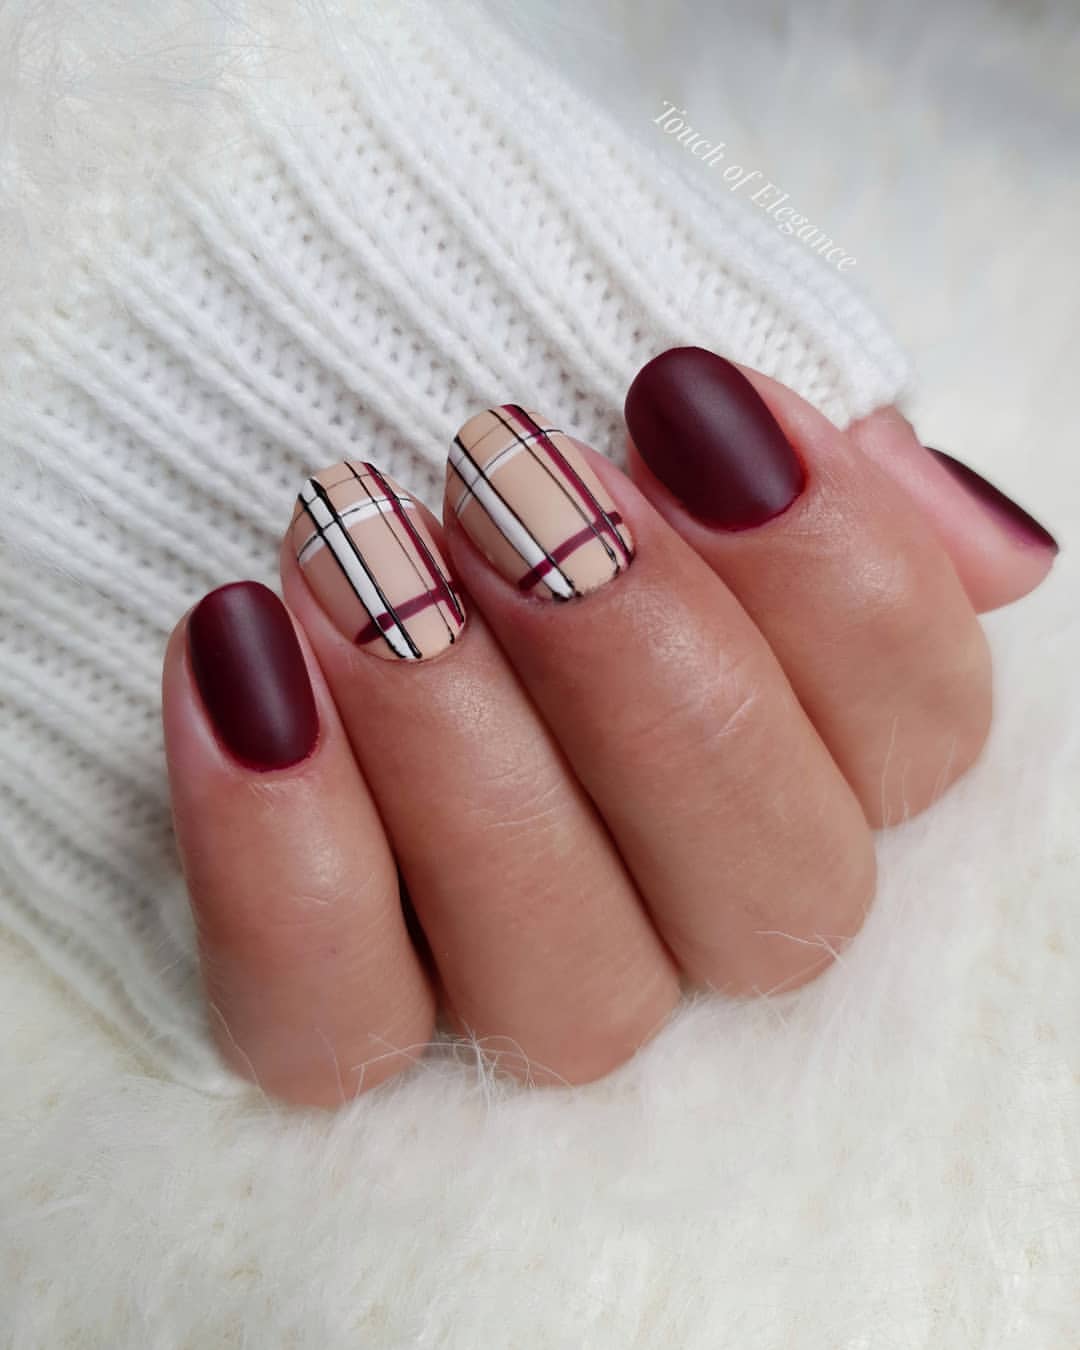 Photo credit: @pmu.gigi
Consumables:
- Base Coat: Butter London Nail Base Coat
- Base colors: Essie ‘Angora Cardi’ (burgundy) and OPI ‘Samoan Sand’ (beige)
- Checkered design: black and white striped nail polishes or thin nail art brushes
- Top Coat: Sally Hansen Matte Top Coat
- Additional tools: Striping tape or nail art brush
DIY Instructions:
- Apply a base coat to protect your nails.
- Paint your nails with burgundy and beige nail polishes and let them dry completely.
- Use striping tape or a thin nail art brush to create the checkered pattern on beige nails.
- Carefully remove the tape and allow the design to dry.
- Apply a matte top coat to finish the look and ensure durability.
Pink and green squares with bows
This cute and feminine design features a pink and green plaid pattern with adorable bow details, creating a fun and cheerful look.
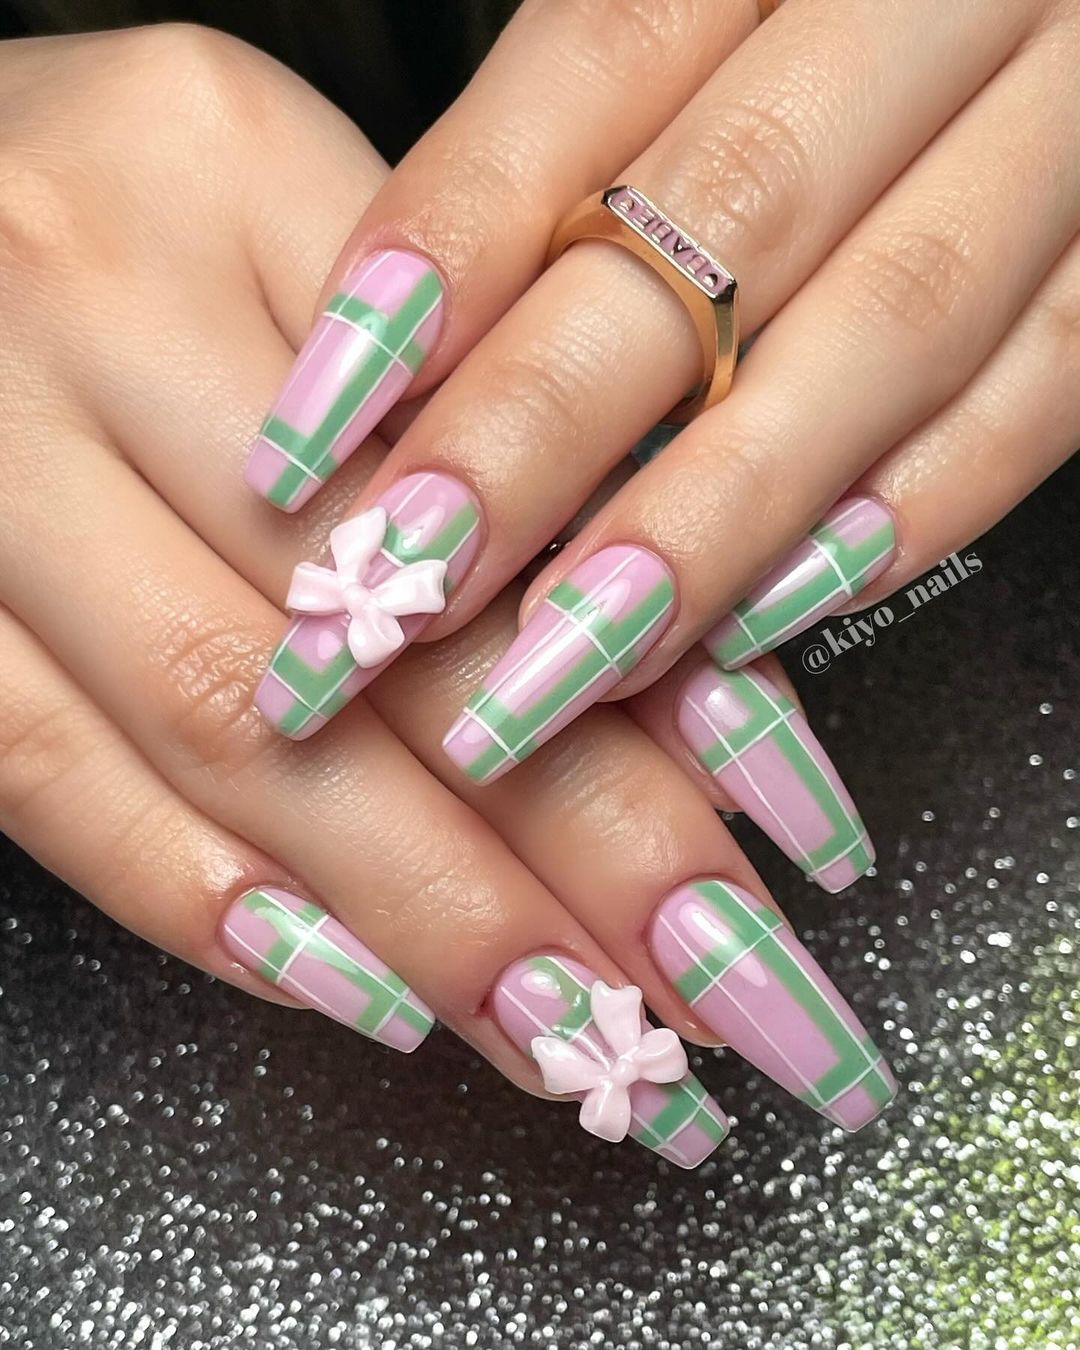 Photo credit: @kiyo_nails
Consumables:
- Base layer: Orly Bonder base layer
- Base Color: Essie ‘Fiji’ (Pink)
- Checkered design: green and white striped nail polishes or thin nail art brushes
- Bows: 3D white bow nail decorations
- Top Coat: Seche Vite Top Coat
- Additional tools: striping tape and nail art brush
DIY Instructions:
- Apply a base coat to protect your nails.
- Paint your nails with pink polish and let them dry completely.
- Use striped tape or a thin nail brush to create the green and white checkered pattern.
- Add the 3D bow decorations to enhance the design.
- Carefully remove the tape and allow the design to dry.
- Finish with a top coat to seal and protect your manicure.
Nails with neon squares
This bright and colorful design features neon checkered patterns on a nude base, creating a fun and eye-catching look, perfect for any season.
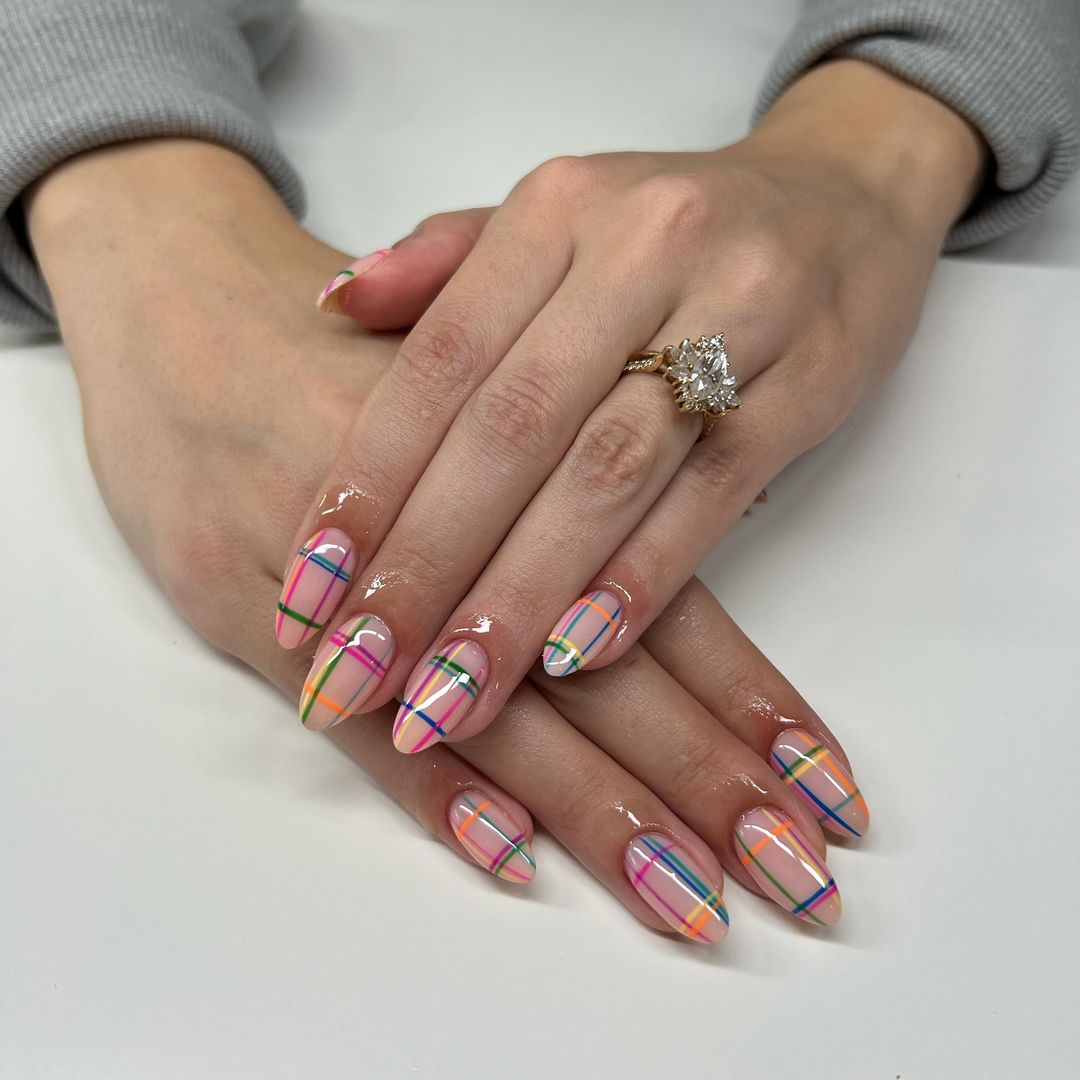 Photo credit: @naillsbyalo
Consumables:
- Base Layer: Essie First Base Base Layer
- Base color: OPI ‘Bubble Bath’
- Plaid Design: Neon pink, green, orange and blue striped nail polishes or thin nail art brushes.
- Top Layer: Sally Hansen Insta-Dri Top Layer
- Additional tools: Striping tape or nail art brush
DIY Instructions:
- Apply a base coat to protect your nails.
- Paint your nails with the nude polish and let them dry completely.
- Use striping tape or a thin nail brush to create the neon checkered pattern.
- Carefully remove the tape and allow the design to dry.
- Finish with a top coat to seal and protect your manicure.
Festive pictures with bows
This festive design features a classic beige and white checkered pattern with red bow detailing, creating an elegant and festive look.
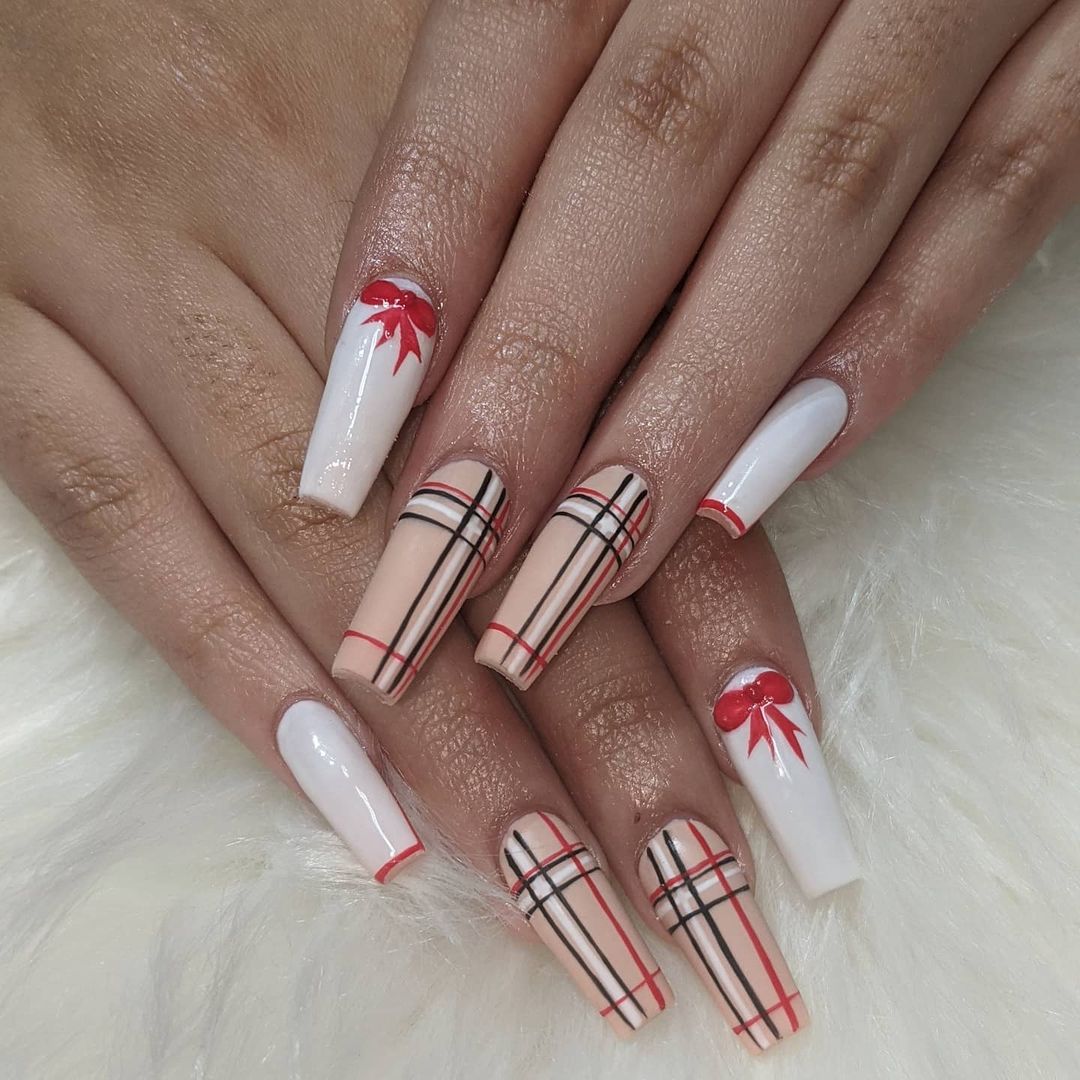 Photo credit: @fatts_beautybar
Consumables:
- Base coat: CND adhesive base coat
- Base colors: Essie ‘Topless & Barefoot’ (beige) and OPI ‘Alpine Snow’ (white)
- Checkered design: black and red stripe polishes or thin nail art brushes
- Bows: Nail decorations with red bows
- Top Coat: Seche Vite Top Coat
- Additional tools: striping tape and nail art brush
DIY Instructions:
- Apply a base coat to protect your nails.
- Paint your nails with the beige and white nail polishes and let them dry completely.
- Use striping tape or a thin nail art brush to create the checkered pattern on beige nails.
- Add the red bow decorations to enhance the design.
- Carefully remove the tape and allow the design to dry.
- Finish with a top coat to seal and protect your manicure.
Frequently Asked Questions
Q: How can I make my plaid nails last longer? A: To ensure your plaid nails last longer, always start with a high-quality base coat and finish with a durable top coat. Reapply the top coat every few days to maintain the shine and protect the design.
Q: Can I create checkered designs on short nails? A: Absolutely! Checkered designs look great on both short and long nails. Just use thinner lines for smaller nails to ensure the design looks neat and proportionate.
Q: What are some great color combinations for plaid nails in the fall? A: Some great color combinations for fall include burgundy and gold, brown and orange, and black and white. These colors capture the essence of fall and look stunning as plaid designs.
Q: How can I practice creating checkered nail designs? A: First, practice on a nail drill or paper. This will help you master creating straight lines and the overall pattern before applying it to your nails.